React and visual automata-based programming
Introduction
This post consists of three parts. In the first one I'm telling about my journey to visual automata-based programming. The second one shows the process of building a GUI using visual automata-based programming. The code is written in JavaScript and React is used to render the view. The last part is a summary of my experience with state machines where I explain how did they change the way I think about state management.
The problem I had
There's something that used to make me struggle a lot every time I was working on a GUI. It's the fact that views change. The user clicks a button and BAM! Sometimes just a small part of the view changes, sometimes the whole view is replaced with a new one. Moreover, they not only change, but also depend on each other! It's not anymore like in the good old days, when we had few static HTML files linking to each other. Every time we visited a particular document, it looked the same (I know, I know, maybe some links were purple and not blue, that's it). Nowadays in web-applications views often depend on events which occurred in the past. Sometimes they display data entered few steps before. Sometimes clicking the same button causes totally different actions depending on what happened earlier.
How was I dealing with it?
There was always some map structure, like a database record, a session object or a plain old JavaScript object that was representing the state of the application. I was then putting conditional statements here and there to compute boolean values based on the state and decide which tiny part of the whole code should actually run.
This approach was good enough, when there were just few screens and they were always changing in the same order, like from A to B and then to C.
When things were getting out of control
Sadly, every time when the number of views was increasing or there was more than just one path the user could take, I was loosing control of all the IFs. When implementing a new feature, I was constantly asking myself:
Is there any other IF I need to update after this change?
Answering this question wasn't so easy, especially when I was working on server-side applications, where forgetting to limit access to some view can potentially lead to insecure direct object references. My development process felt like a dirty hack. In the end what I was doing was using IFs to tell which part of the code should run and which shouldn't.
Moreover, it wasn't just me who was asking questions about the system. Except the case when I was working on my personal projects, there were always some people I was working for. They were also asking questions like the following two.
What are all the ways a user can go from the screen A to the screen B?
Can we add an intermediate step between A and B?
Very often, even though I had the project opened in the editor, I couldn't quickly answer those questions. In order to reach the IFs responsible for the behavior, I needed to dig deep into the code. It was giving me a headache.
From sketching to the discovery of automata-based programming
I became a big fan of sketching. Nothing fancy, just some pictures representing the overall behavior of the code I was working on. Like here's a screen like this, something happens and we get that different screen. Very much like user flows we get from UX experts or... one of the fundamental concepts in computer science - state machines. This is the time when I started wondering if I could make use of state machines in my day to day job. I knew that they could be useful if I were about to do things like parsing a language or drawing a representation of a turnstile. But could they help me to program web applications?
There's a wide term called automata-based programming. The Wikipedia definition of automata-based programming goes like this.
Automata-based programming is a programming paradigm in which the program or part of it is thought of as a model of a finite state machine (FSM) or any other (often more complicated) formal automaton (see automata theory).
The idea of making a set of boxes connected with arrows the skeleton of an application always sounds great to me! It's like bringing my sketches to life, or at least making the gap between the language used to program and the language used to design a lot smaller. So I started with a data structure representing the graph and possible transitions. It was very much like transition tables. Soon it turned out that a simple state machine function, which takes the current state and an event and returns a new state, wasn't sufficient, because I still needed to use some conditional statements to determine what to do based on its result. So the very next thing I did was using this graph description as a recipe for a stateful object, which responsibility was to call functions based on the current node of the graph. Since then I experimented a lot and changed many details, but this is one of the things I haven't changed. I really wanted to run away from IFs and method dispatch based on the state of a state machine finally allowed me to do it. It felt like a relief! I got hooked on automata-based programming.
I missed drawing
It became clear to me that many of the problems I used to consider hard to code can be easily solved using elegant graphs. I do really enjoy expressing logic as graphs! But I must say that when it comes to transition tables, I like them a lot less. To me, it's harder to wrap my head around a transition table. When I take a look at simple graph, I can immediately get basic understanding of what's going on. But when I look at a transition table, it takes me a while. Most of the time I try to imagine a graph in my head. When it's too complicated, I grab a pen and draw the graph, so I can look at it. I think you already know what I am going to say. Programming by coding graphs is fun, but not that much fun as programming by drawing graphs! That's why I decided to build a graphical editor that would generate the graph code based on a drawing. This way I could code just what I find handy to code and draw the rest. And that's how I got into visual automata-based programming.
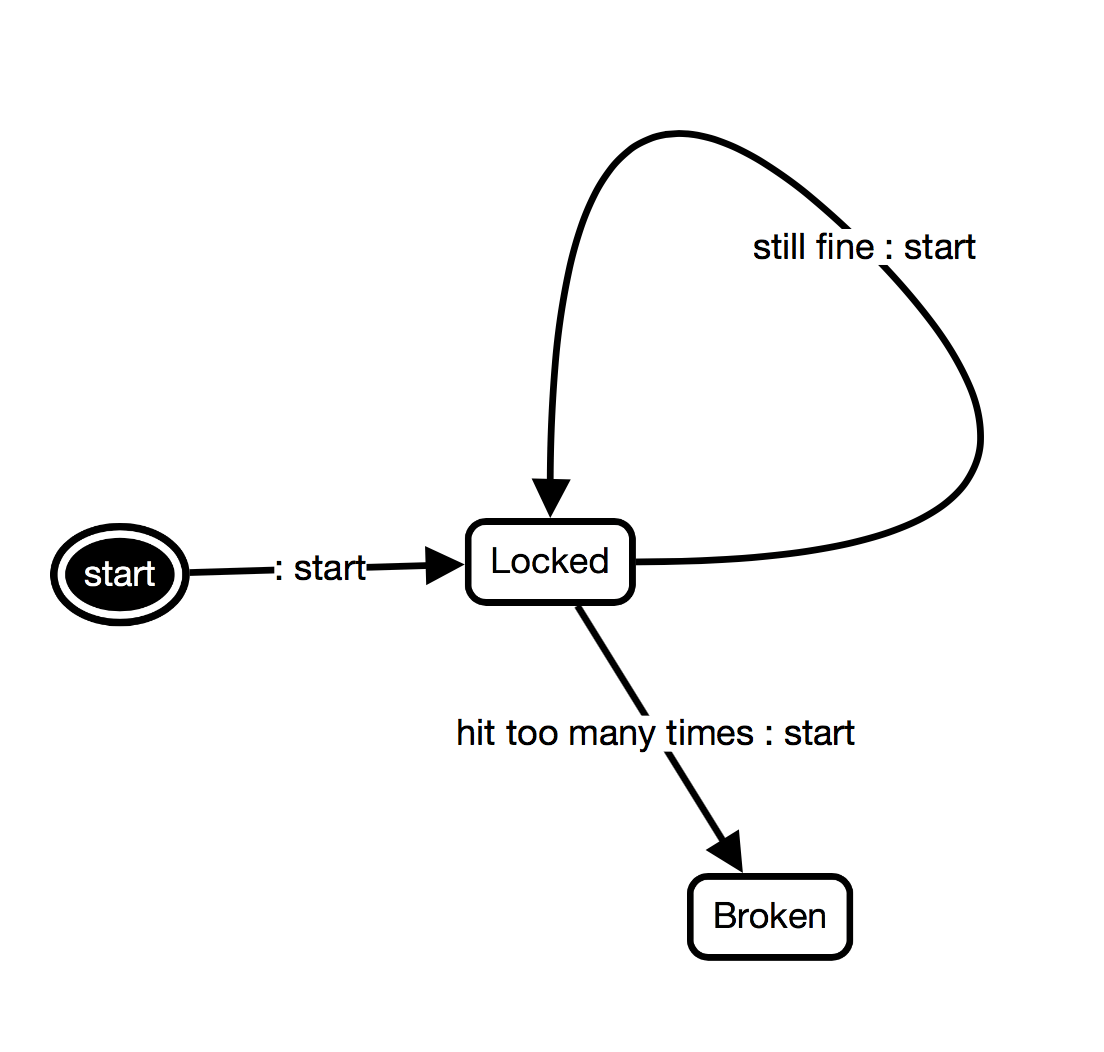
This is how I was programming a simple graph, when I started playing with the idea of automata-based programming in 2016.
'locked',
[
    'locked' => [
        'still_fine' => 'locked',
        'hit_too_many_times' => 'broken'
    ],
    'broken' => []
]
And this is how I prefer to program it nowadays.
In this post I'd like to show you the whole process of building a GUI, which illustrates all the things I like about state machines applied to web applications.
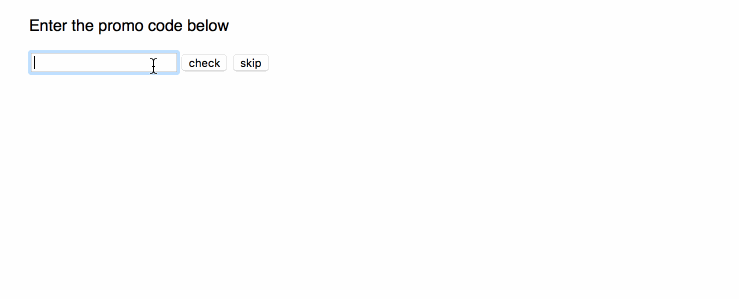
What we're going to build
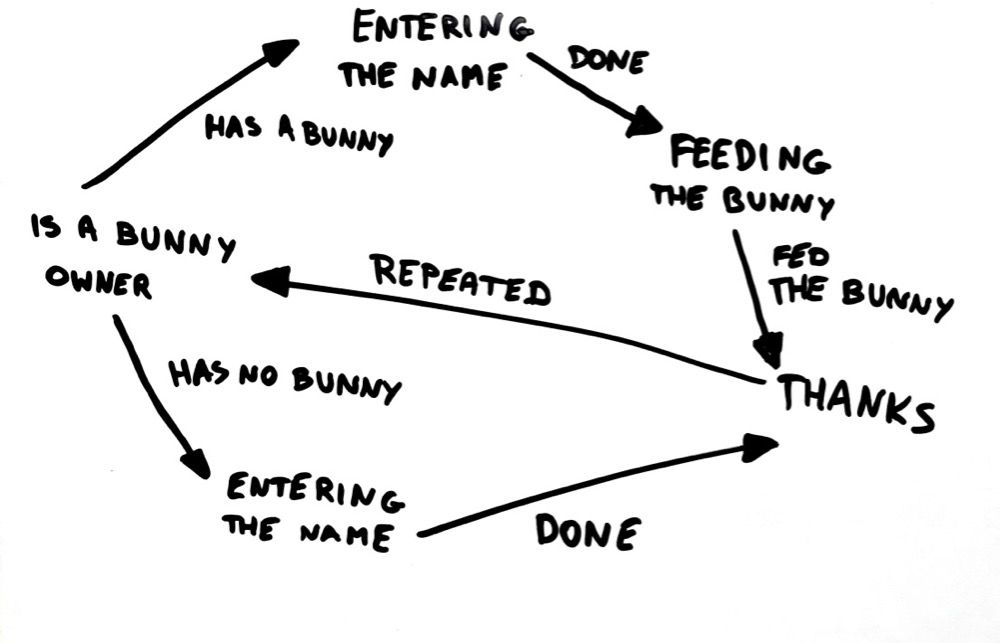
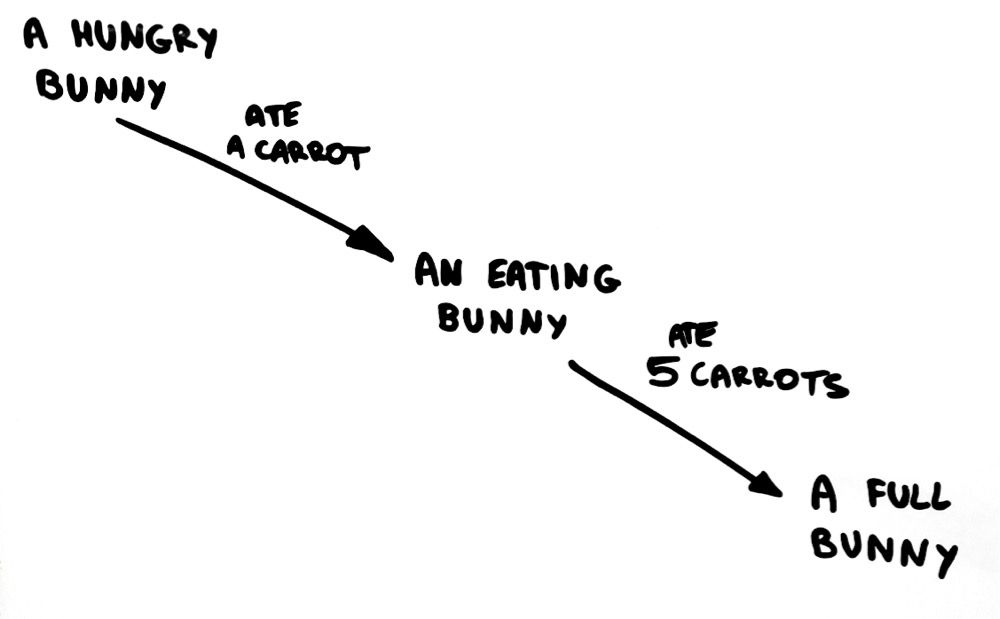
We're going to build a client-side application with few screens. At the home screen the user is asked whether she is a bunny owner. The next step is always about entering the user name. Then, bunny owners need to feed their bunnies before they can see the "thank you" message. Those who have no bunnies see "thank you" right after entering their names. It's important to note that the bunny is hungry every time we see it and that we need to first find a carrot before we can give it to the bunny.
Here are few whiteboard drawings showing how screens change.
The toolbox
The two most important libraries used to implement the application are:
For testing purposes we're going to use the following tools:
- Enzyme (to make assertions easier)
- Jest (it allows to run our tests and ships with useful matchers)
- Sinon (to make sure the UI makes proper function calls)
All the packages are going to be installed using npm and the project is going to be bootstrapped with Create React App.
React is going to be used mostly as a Virtual DOM library and a convenient starter kit thanks to Create React App, while both the data-related state and behavior-related state are going to be managed using Rosmaro.
Setting up the environment
Let's fire up the terminal and use Create React App to bootstrap our project.
create-react-app bunny-app
cd bunny-app
Please bear in mind that in order for this command to work, you'll need to have node, npm and create-react-app installed.
The generated index.js file looks like this.
import React from 'react';
import ReactDOM from 'react-dom';
import './index.css';
import App from './App';
import registerServiceWorker from './registerServiceWorker';

ReactDOM.render(<App />, document.getElementById('root'));
registerServiceWorker();
Now we're going to install packages related to Rosmaro.
npm install --save rosmaro rosmaro-in-memory-storage rosmaro-process-wide-lock rosmaro-reactThen, the App element is going to be replaced with the RosmaroReact element. Because we won't need App.css, App.js, App.test.js, we can safely remove those files together with their imports.
The index.js file should now look like this.
import React from 'react';
import ReactDOM from 'react-dom';
import './index.css';
import makeStorage from 'rosmaro-in-memory-storage';
import makeLock from 'rosmaro-process-wide-lock';
import RosmaroReact from 'rosmaro-react';
import graph from './graph.json'; // The generated graph
import handlers from './handlers/all';
import registerServiceWorker from './registerServiceWorker';

const rosmaroOpts = {
  graph,
  handlers,
  storage: makeStorage(),
  lock: makeLock()
};

ReactDOM.render(<RosmaroReact {...rosmaroOpts} />, document.getElementById('root'));
registerServiceWorker();
Let's go step by step through the modified file.
Rosmaro-related packages are imported.
import makeStorage from 'rosmaro-in-memory-storage';
import makeLock from 'rosmaro-process-wide-lock';
import RosmaroReact from 'rosmaro-react';
The rosmaro package itself is not being imported, because it's already a peer dependency of rosmaro-react
We've replaced the App element with the RosmaroReact element.
const rosmaroOpts = {
  graph,
  handlers,
  storage: makeStorage(),
  lock: makeLock()
};

ReactDOM.render(<RosmaroReact {...rosmaroOpts} />, document.getElementById('root'));
For better understanding of rosmaroOpts please take a look at the Building a model chapter of the Rosmaro documentation.
As you may have noticed, there are two extra imports.
import graph from './graph.json'; // The generated graph
import handlers from './handlers/all';
They are the two main ingredients of a Rosmaro model we haven't created yet:
- a graph describing changes of behavior
- pieces of code handling different behaviors
Let's start by creating empty files:
mkdir src/handlers && touch src/handlers/all.js && touch src/graph.jsonAt this point only test libraries are missing.
npm install --save sinon enzyme enzyme-adapter-react-16 react-test-rendererAccording to the documentation of Enzyme this is how we setup the tests.
// src/setupTests.js
import { configure } from 'enzyme';
import Adapter from 'enzyme-adapter-react-16';

configure({ adapter: new Adapter() });
That's pretty much it! The environment is ready.
This command, provided by Create React App, starts a dev server.
npm run startAnd this is how we run the tests
npm run testModeling changes of behavior using the Rosmaro Editor
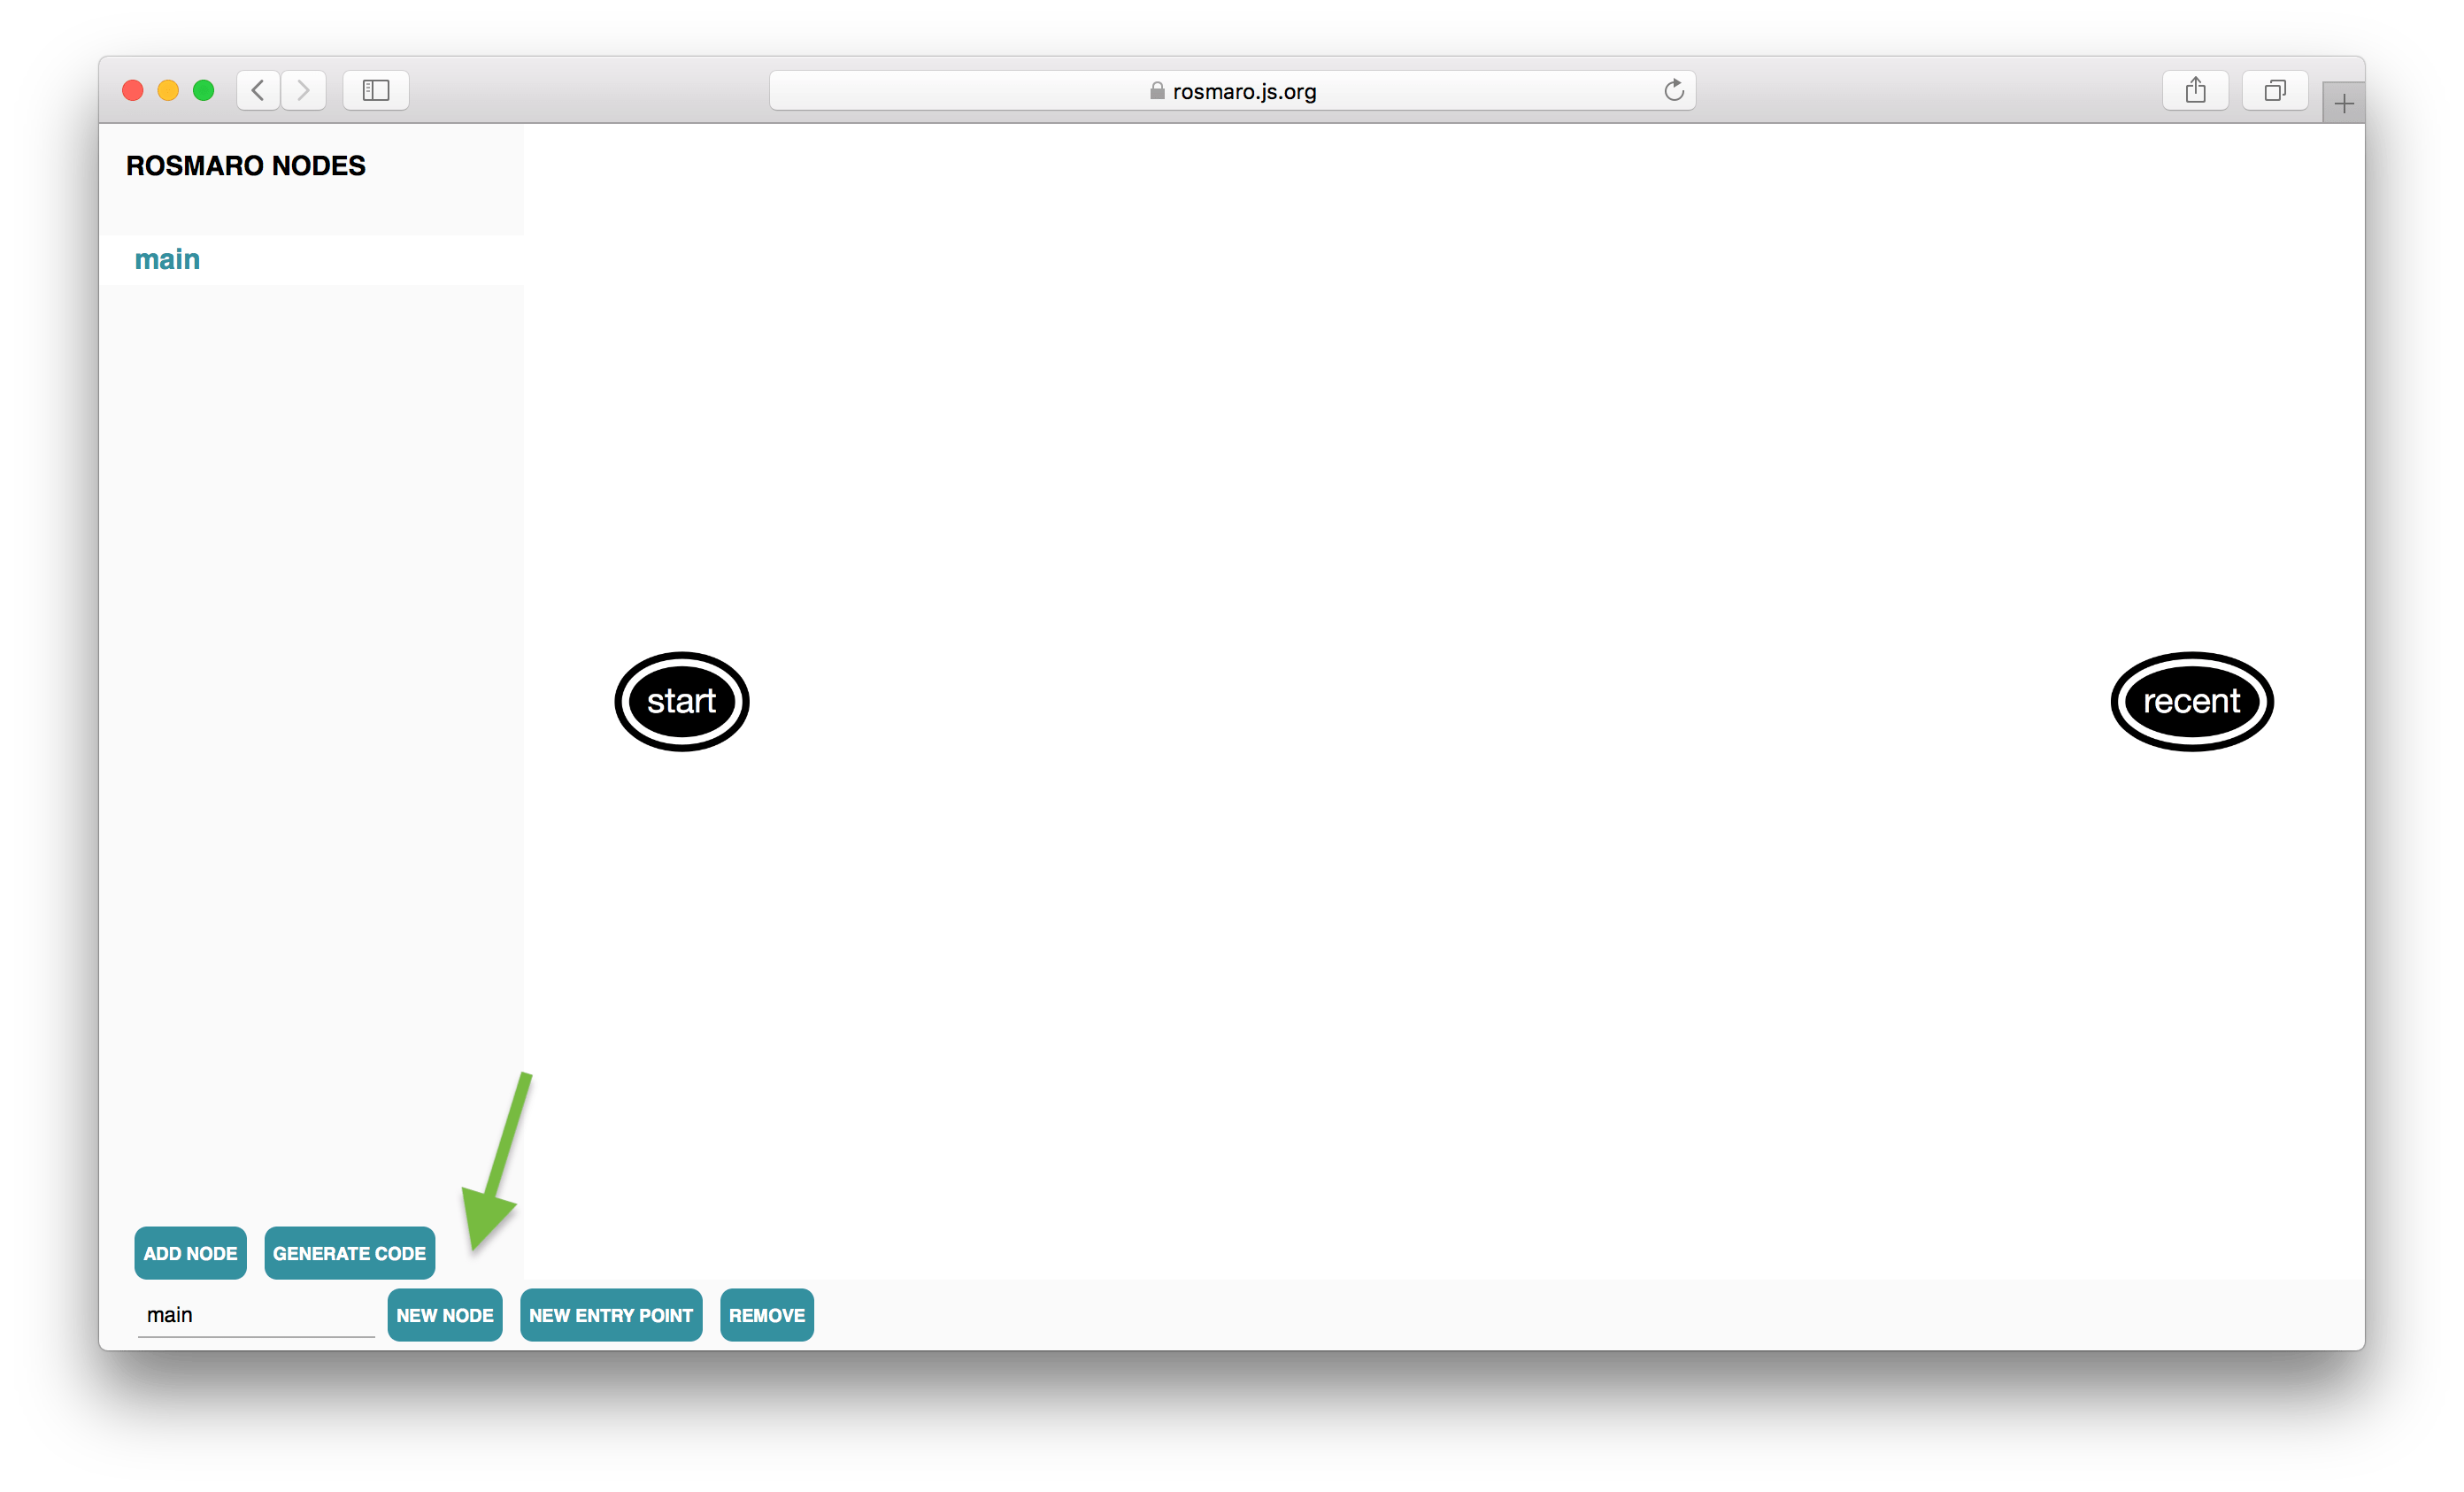
It's time to fire up the Rosmaro editor. Because our graph.json file is empty, there's nothing to import. We can simply click LOAD to start drawing a new graph.

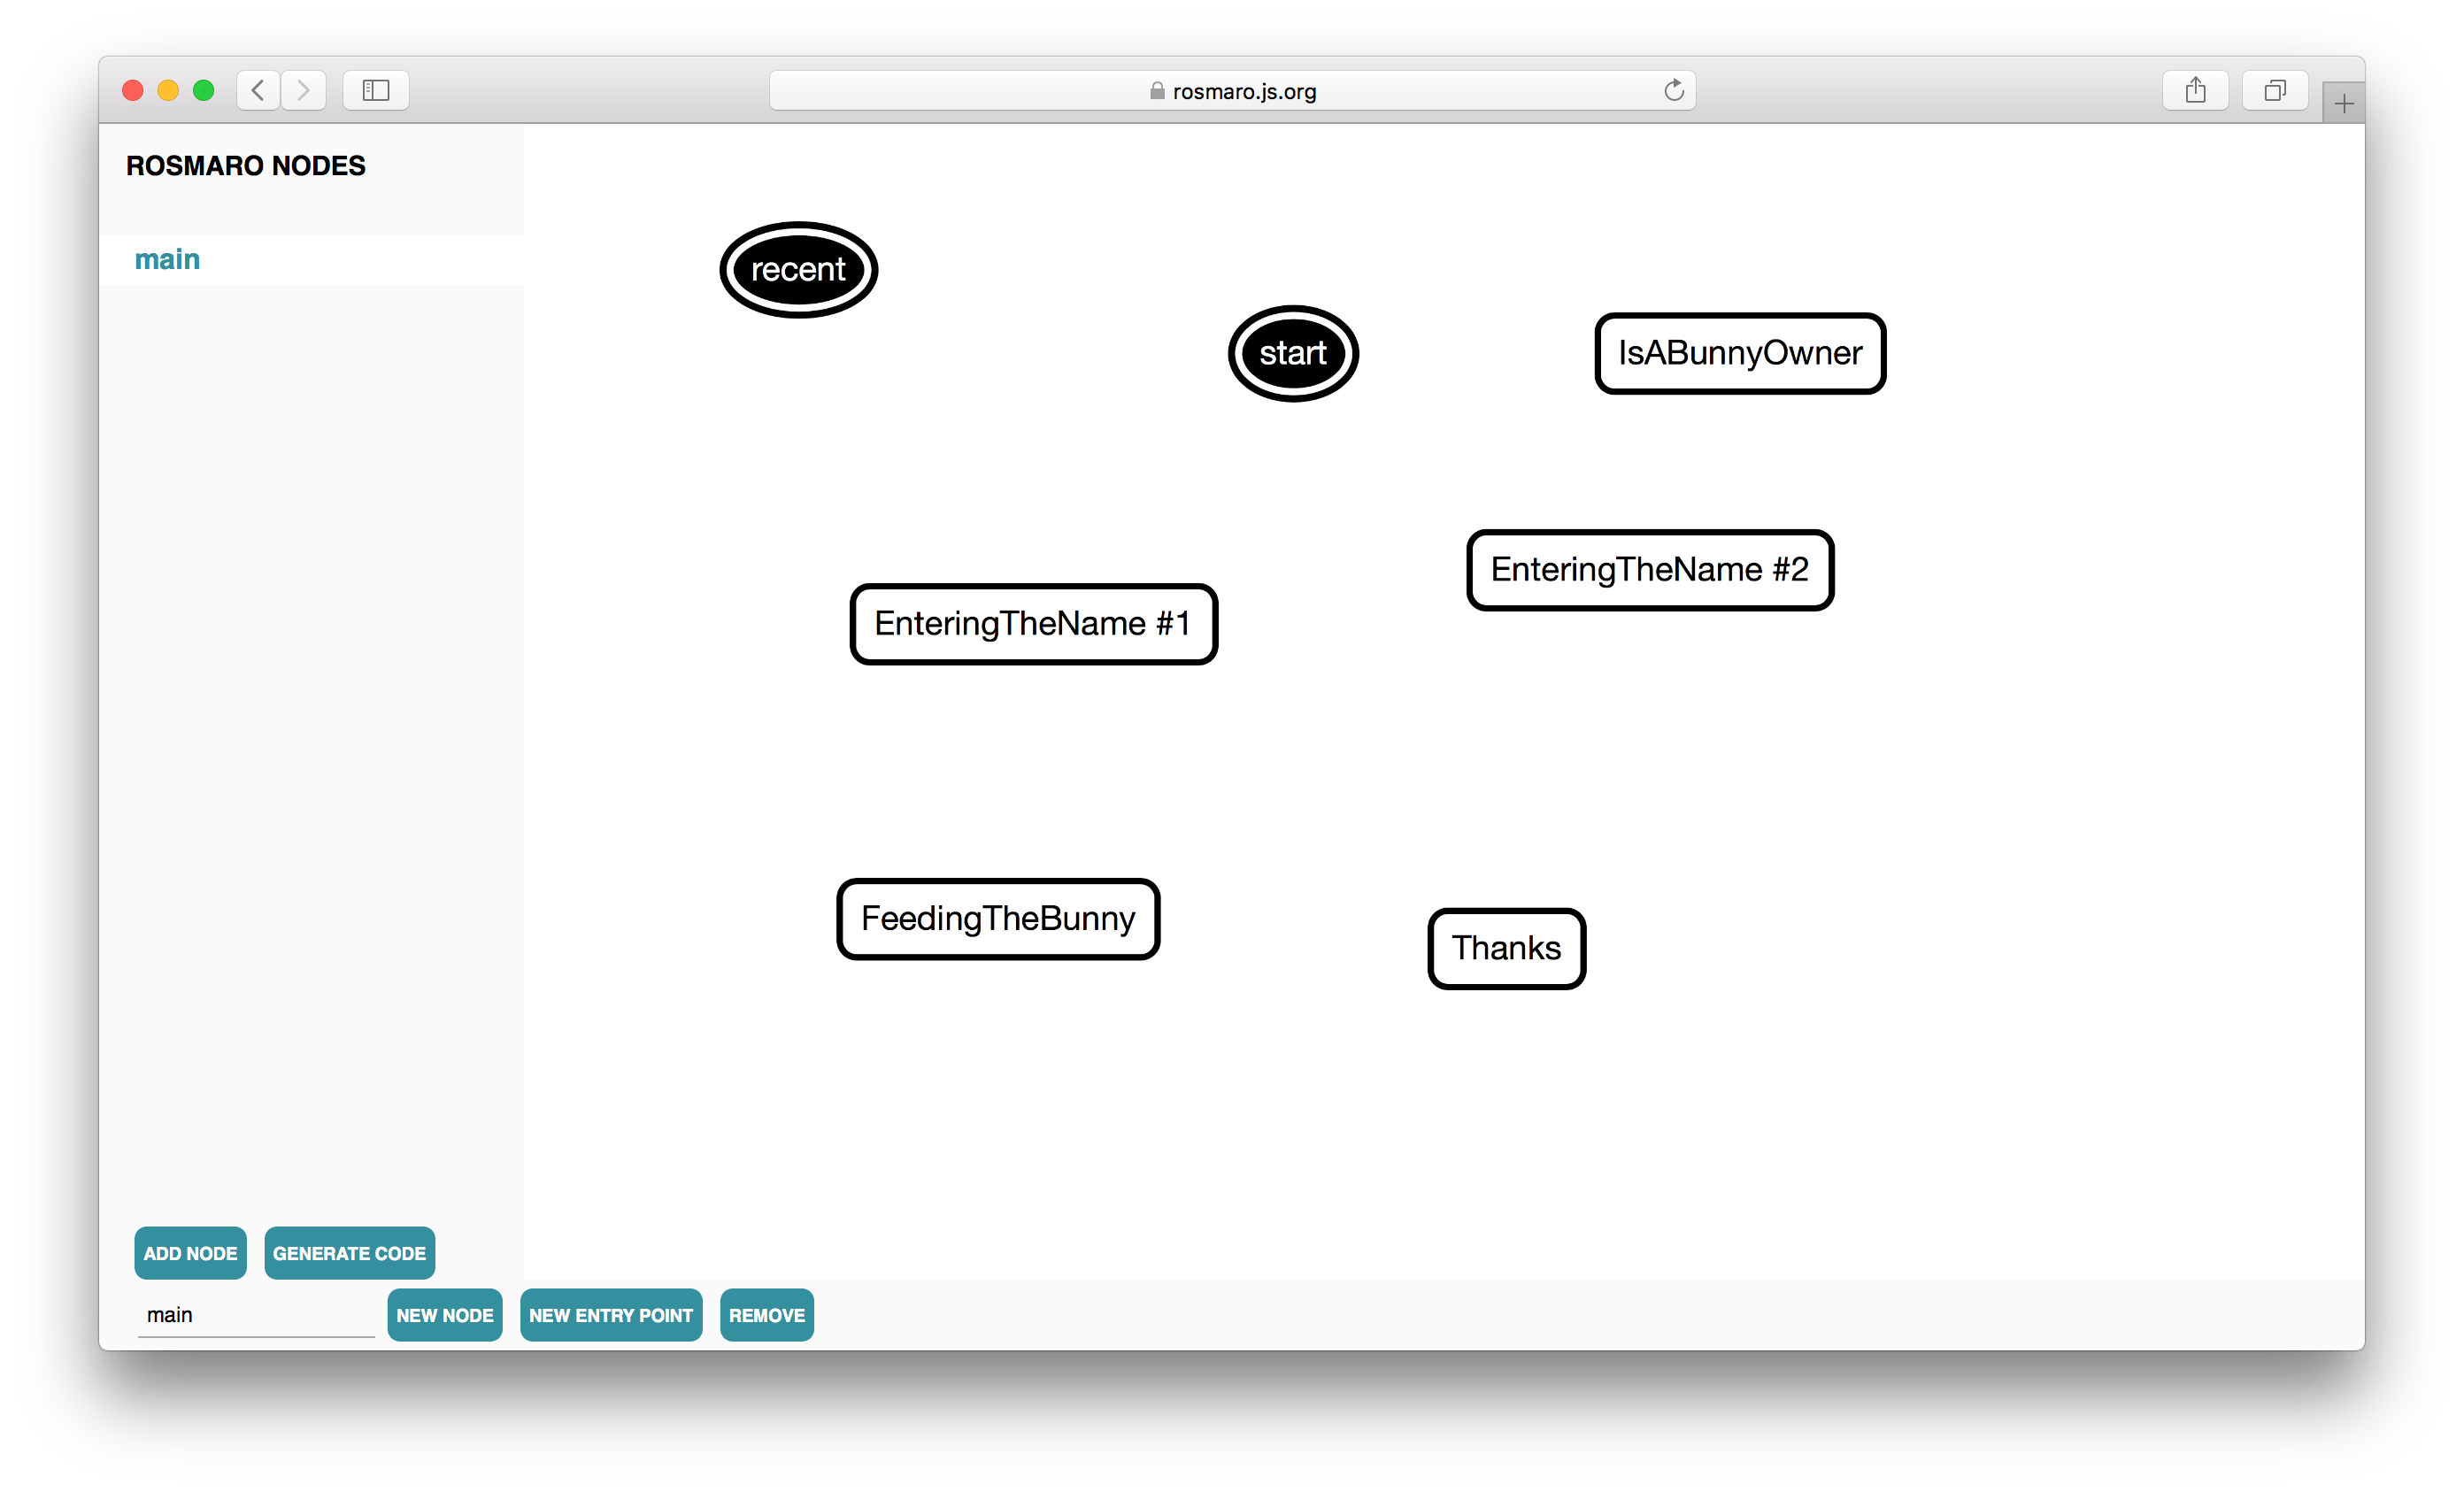
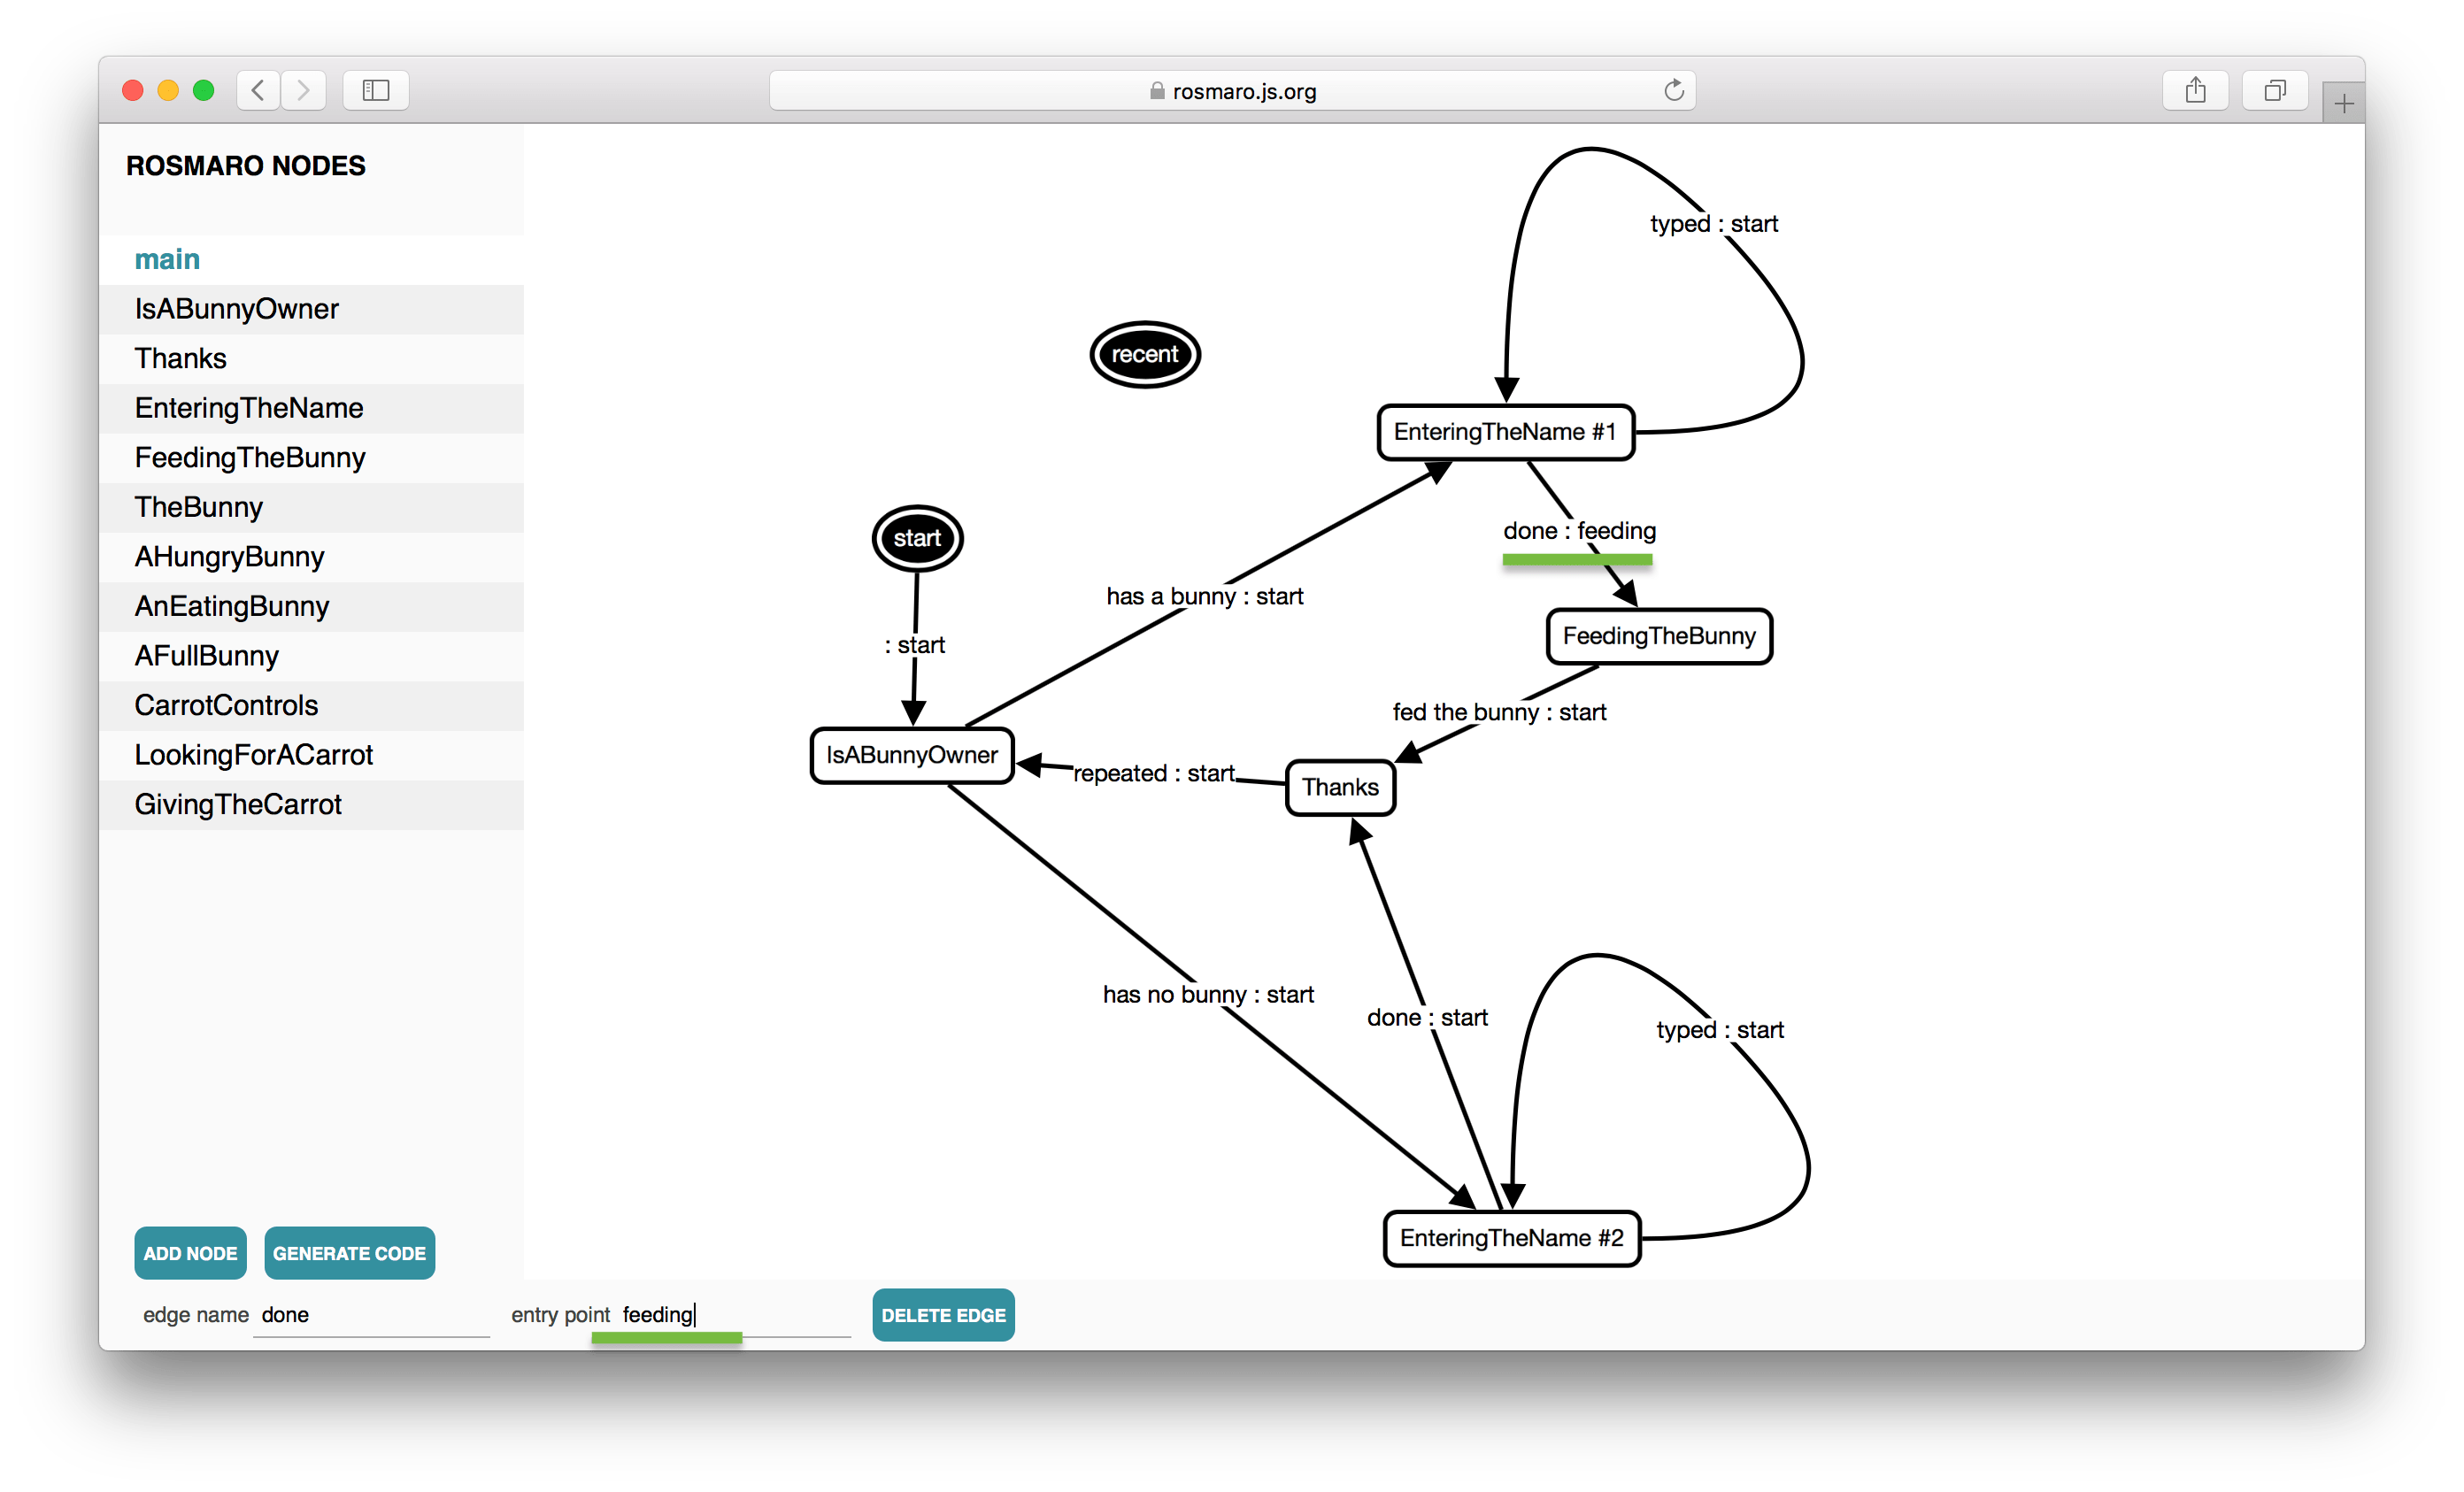
Every Rosmaro model must have a main node. In our case it's the following graph.
We add it by clicking ADD NODE and typing its name.
Now we're going to add the first graph child.
In order to make binding handlers convenient, we're going to use CamelCase node names. That's why we're adding a local node called IsABunnyOwner.
Local nodes are what we draw as children of composites and graphs. Handlers cannot be associated with local nodes. Actual nodes are used as underlaying nodes for local nodes. They may be associated with handlers.
In the whiteboard drawing there are two nodes called ENTERING THE NAME. Because Rosmaro local nodes must have unique names, we're simply going to call them EnteringTheName #1 and EnteringTheName #2.

Then, we add the remaining local nodes: FeedingTheBunny and Thanks in the same way.
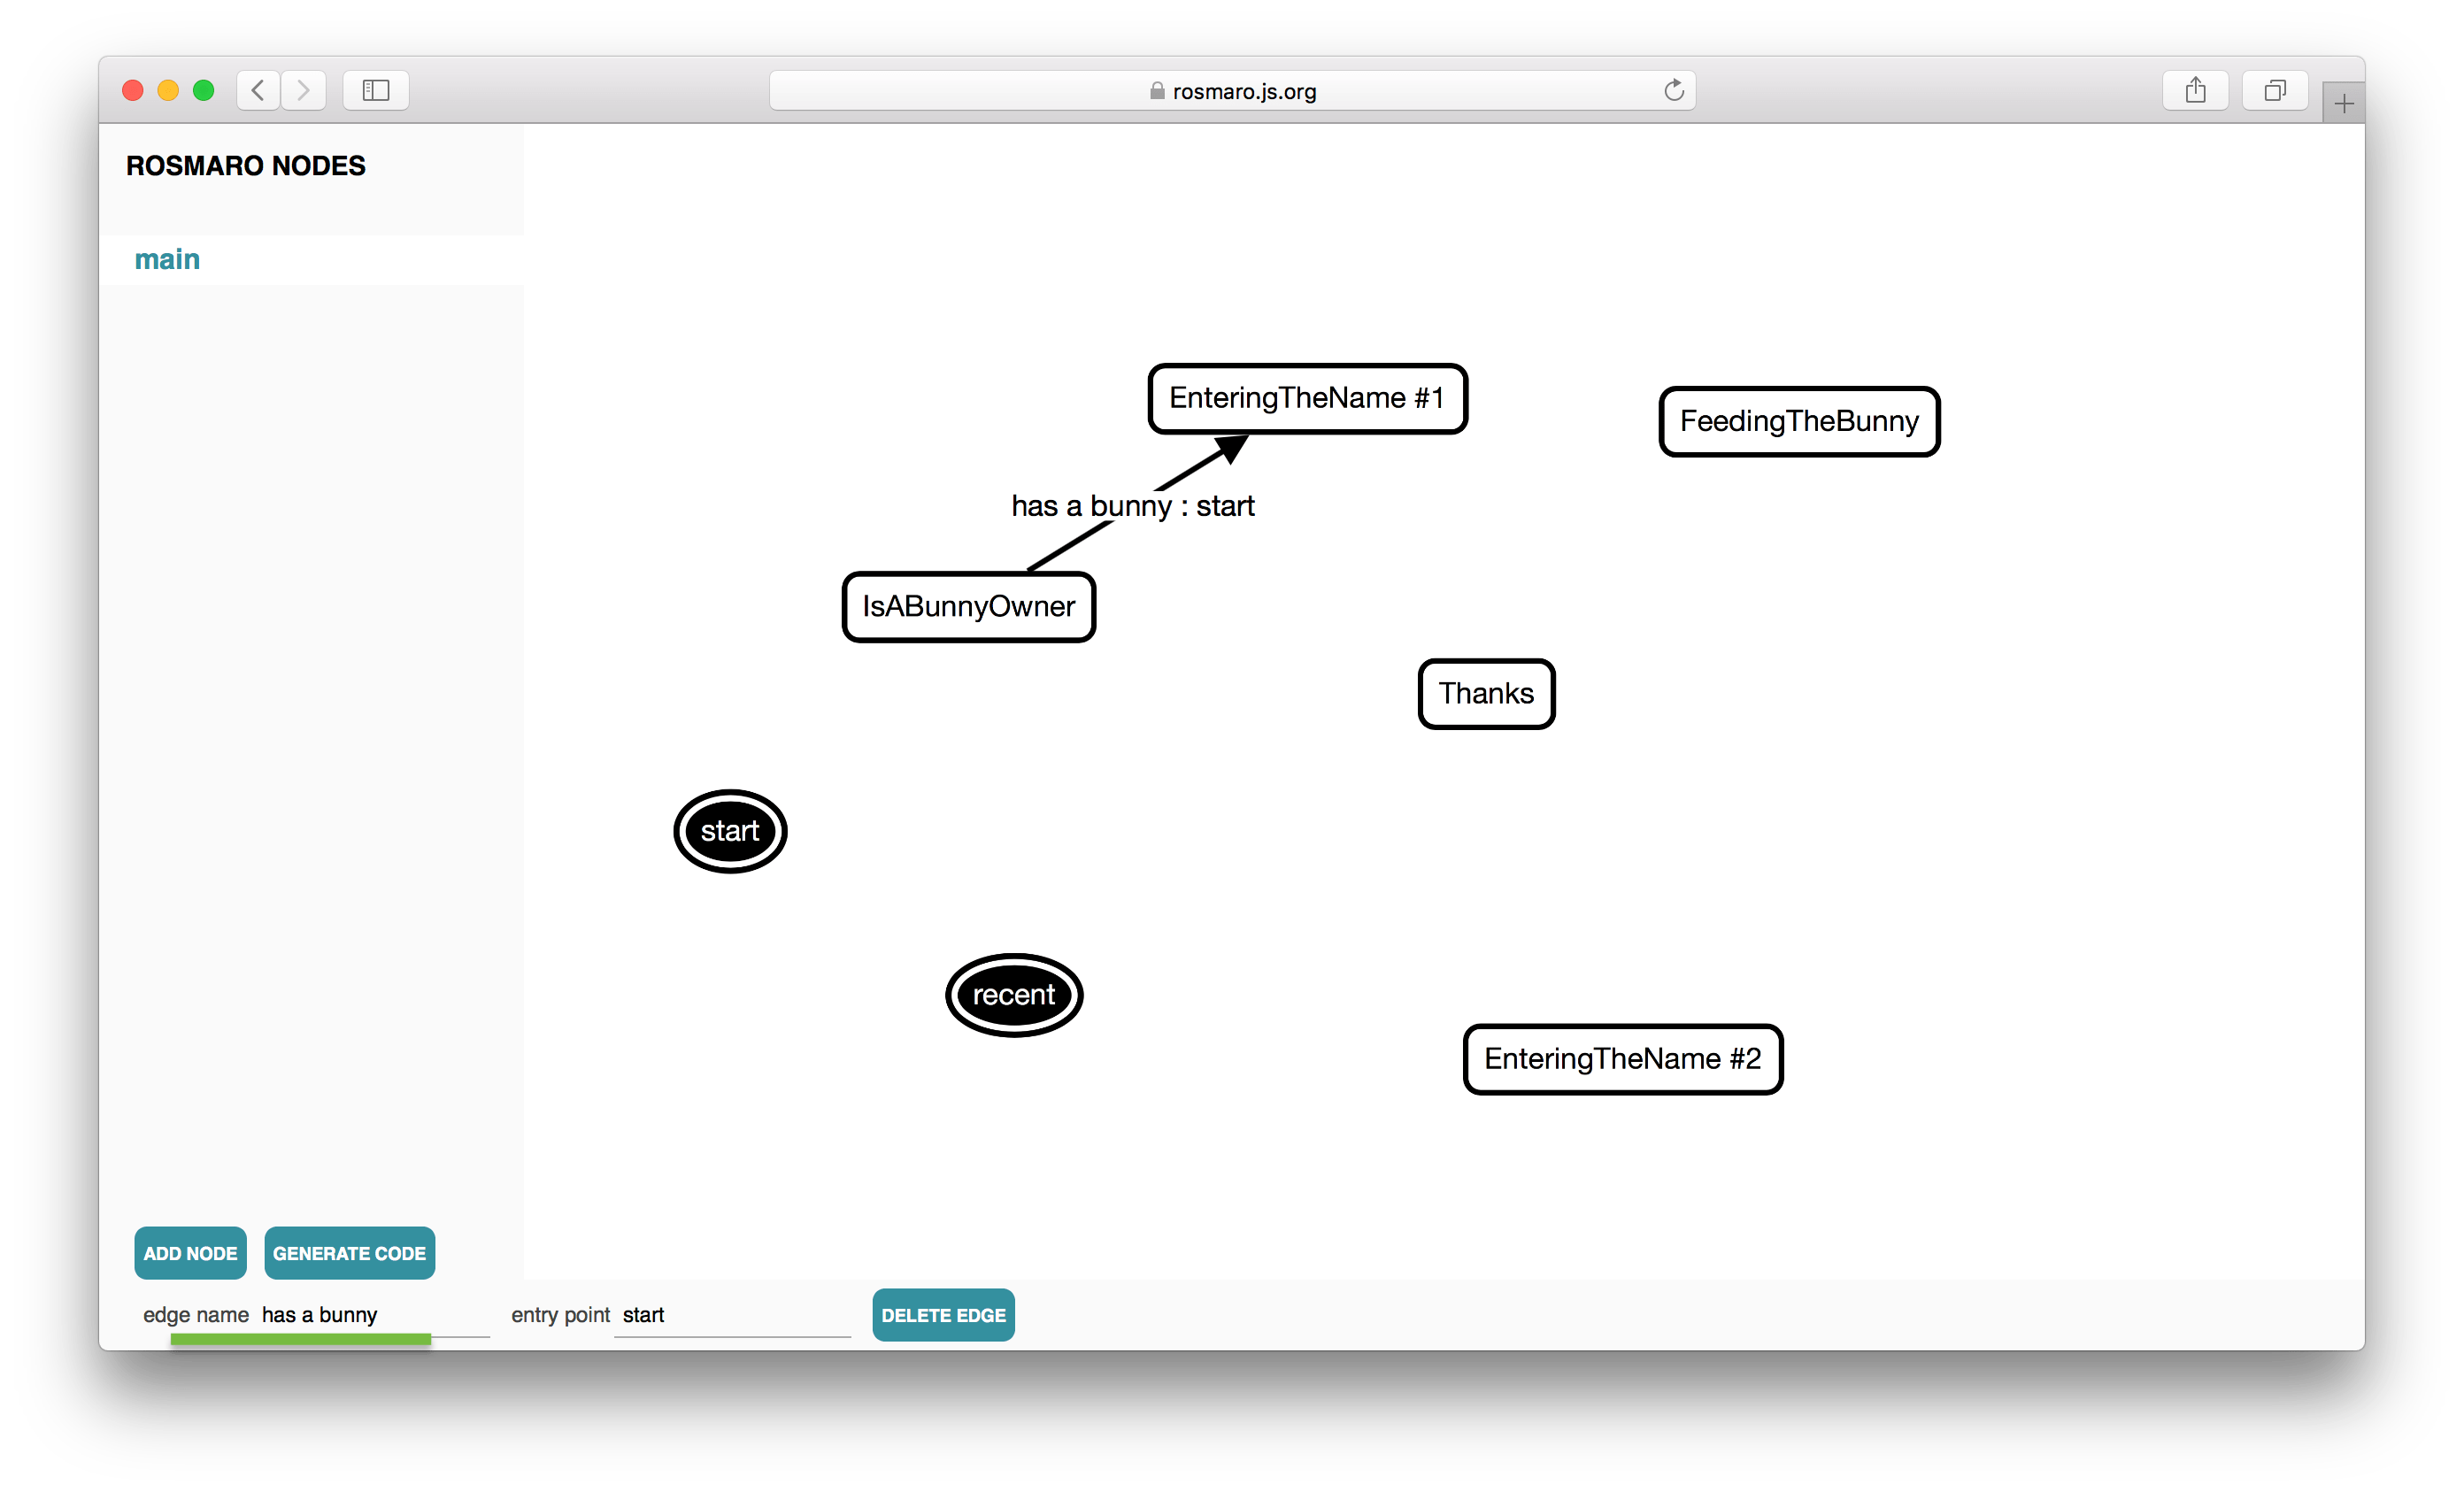
Now it's time to add arrows. In order to do it, we need to put the cursor over some node, aim the square handler displayed on it and drag a line from it to another node.
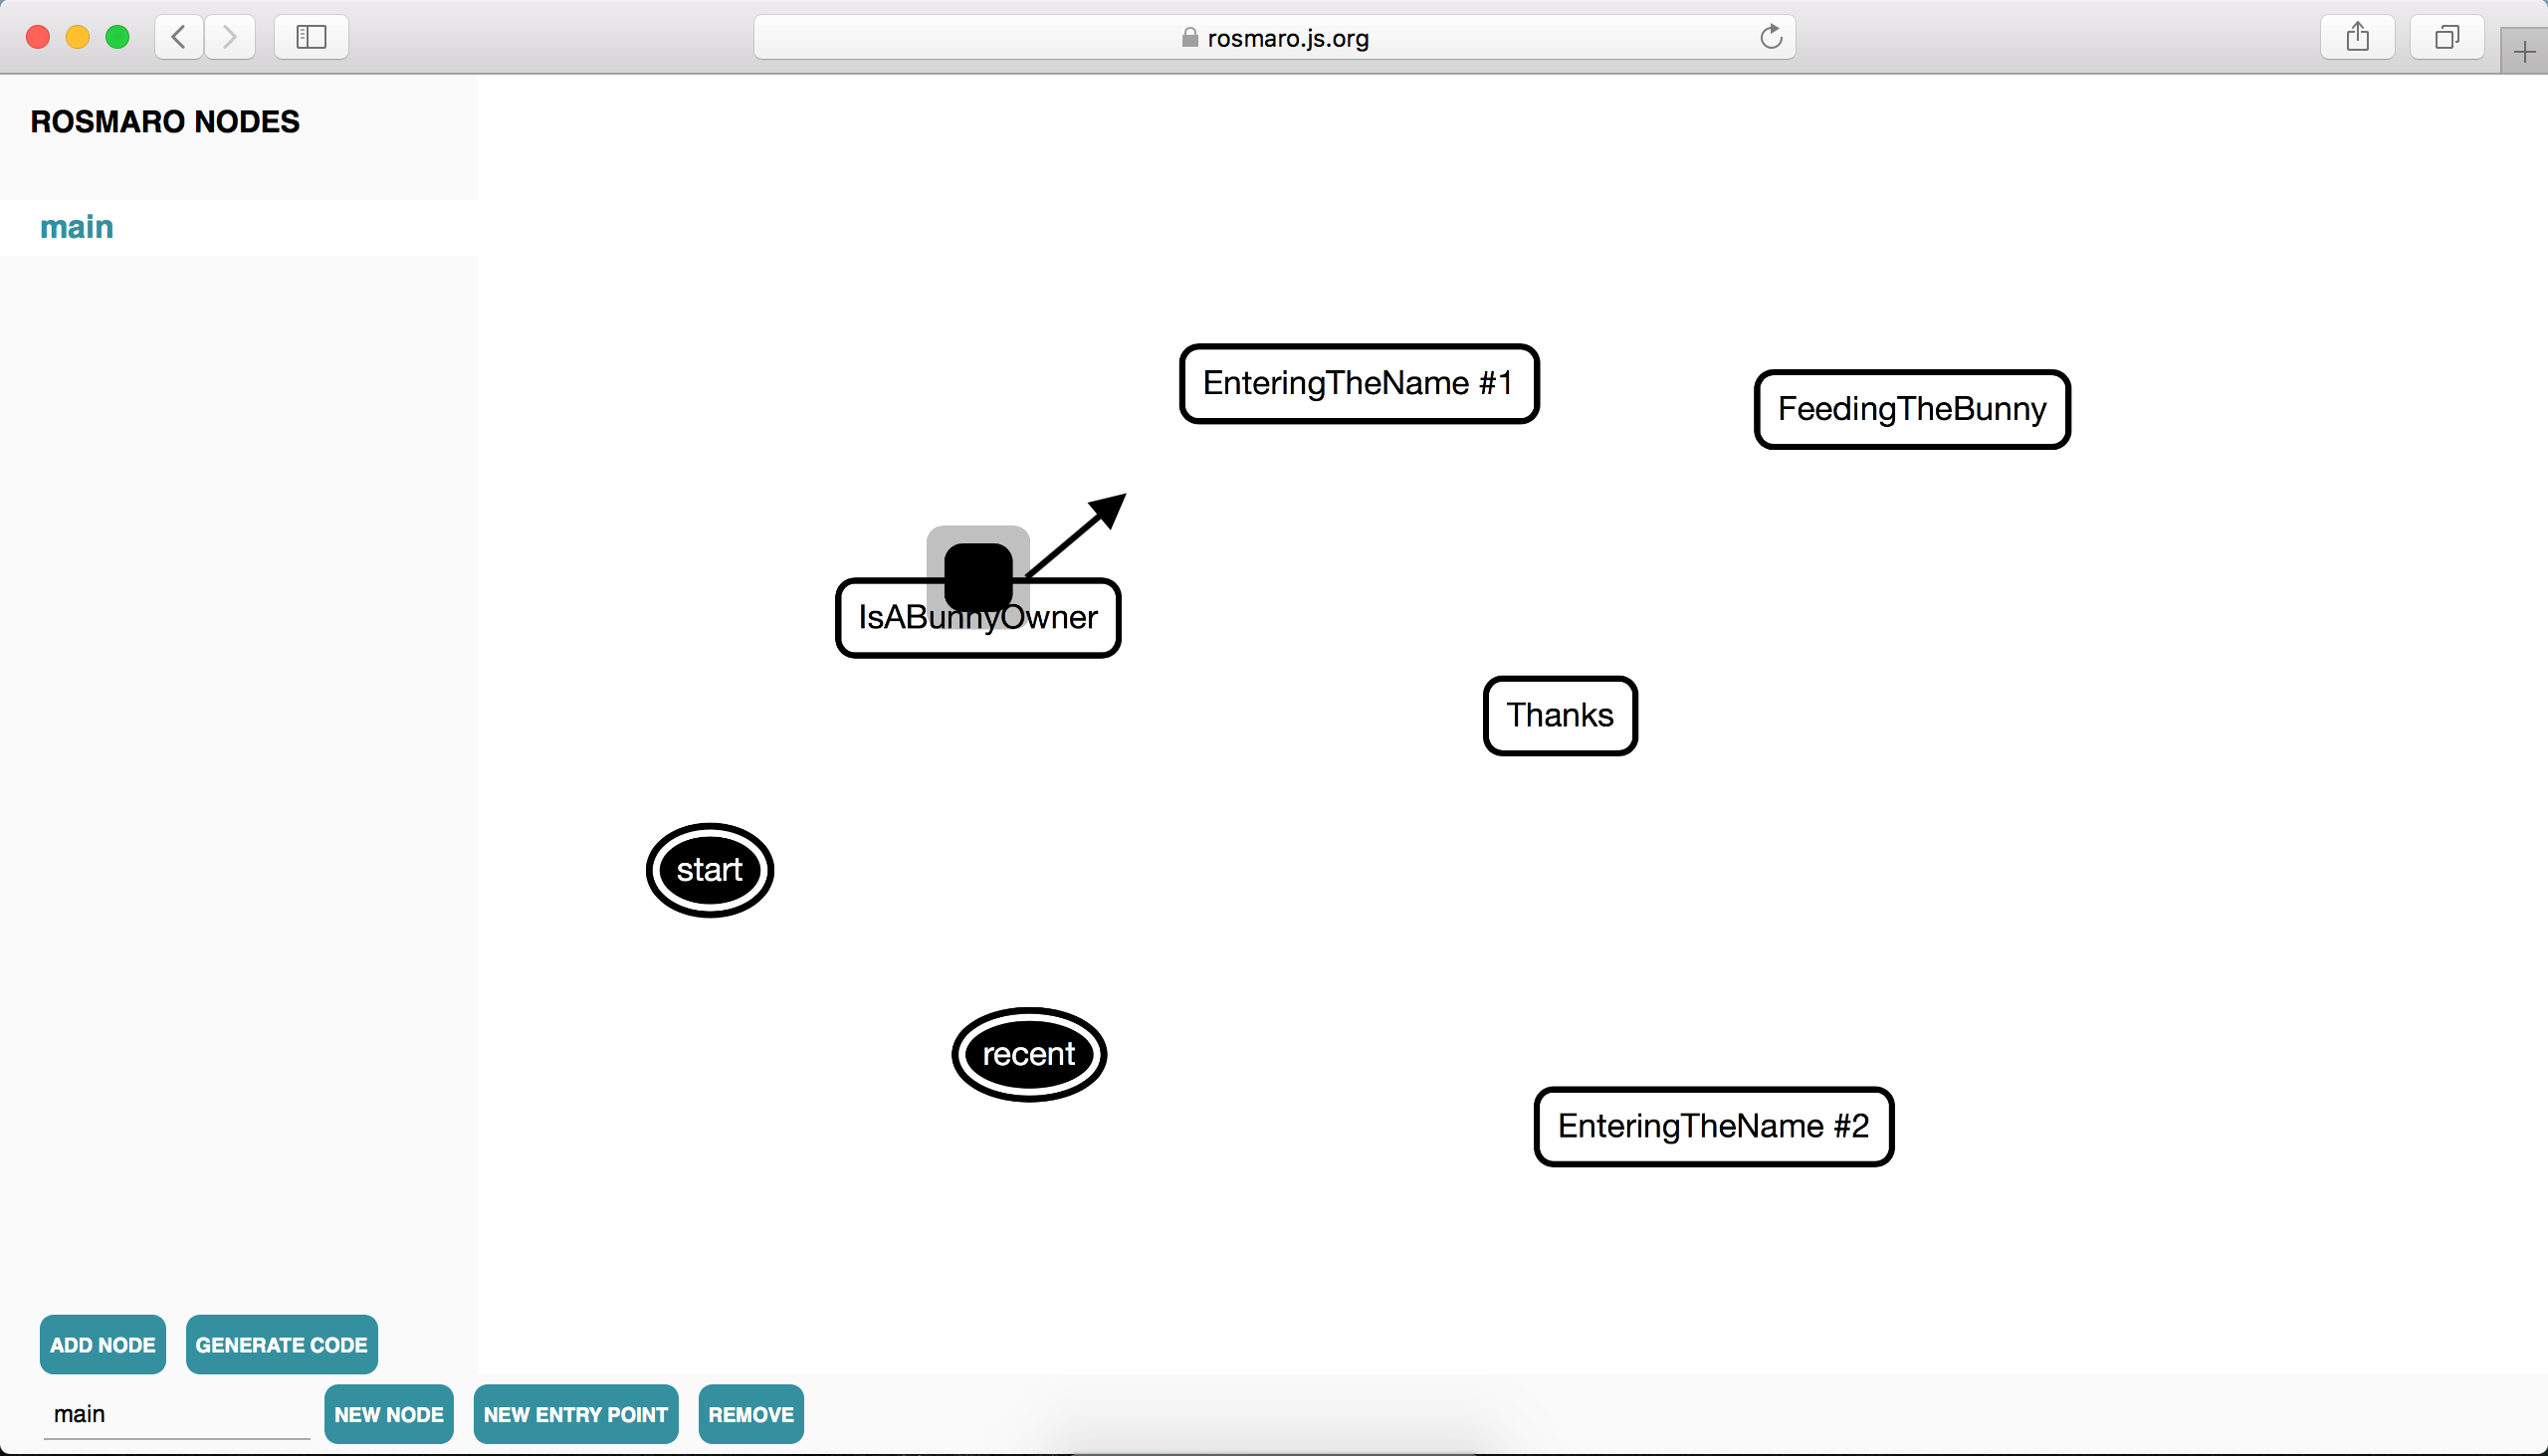
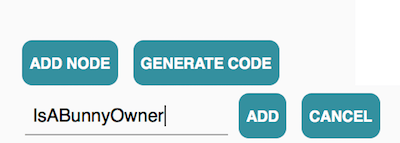
At this point, the newly created arrow can be customized. All we need to do is to click it and then enter its new name. This one is going to be called has a bunny and will tell us what happens when the user has a bunny - she goes from the home screen to the screen where she's supposed to enter her name.
Let's draw all the remaining arrows and call them after events which cause behavior changes.

This graph isn't finished yet. The whiteboard drawing wasn't perfectly detailed. There are at least two missing elements:
- the initial node
- underlaying nodes
We need to specify that this graph starts from the IsABunnyOwner node. All we need to do is to draw an arrow from the start entry point to the IsABunnyOwner node.
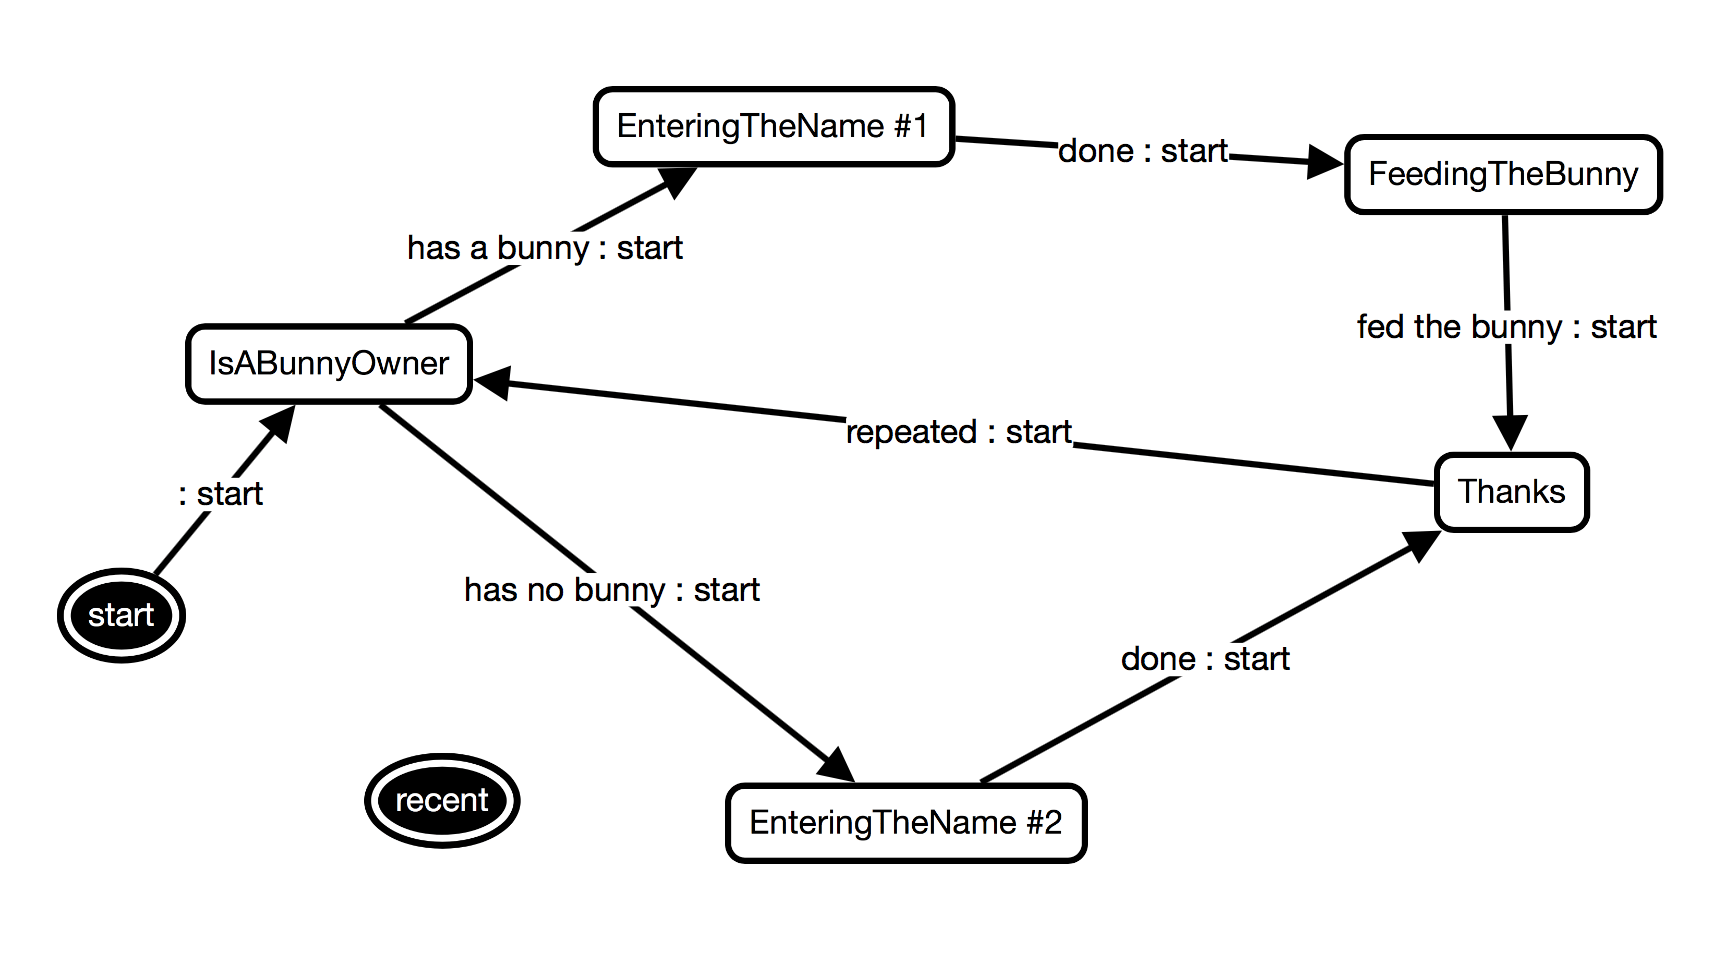
Selecting underlaying nodes means specifying which graph node actually lays under a local graph node. For example, there's the IsABunnyOwner local node. But what's its type? Is this a leaf? Or maybe it's a subgraph? In order to make it clear, we need to add an actual node and wire it with the local node. It may sound a bit complicated, but it's actually pretty simple. Here's how we do it.
First, we need to create the actual node. We do it exactly in the same way the main node was created, because main is an actual node as well.
Then, we go back to the main node, select the IsABunnyOwner local node and select the IsABunnyOwner actual node as its underlaying node. That's it!
The Thanks node is a leaf as well. We add and wire it in the same way as we did it with the IsABunnyOwner node.

Nodes EnteringTheName #1 and EnteringTheName #2 are a bit more interesting, because even though they are two separated local nodes from the point of view of the main node, they utilize the exact same actual node as their underlaying nodes. That's why we add just one actual node EnteringTheName.
Then we pick it as the underlaying node for both EnteringTheName #1 and EnteringTheName #2.


FeedingTheBunny is going to be far more complicated. Here's how we decided that it has two regions:
- the bunny itself
- controls for carrots (looking for carrots and giving them to the bunny)
It makes it a composite with two children.

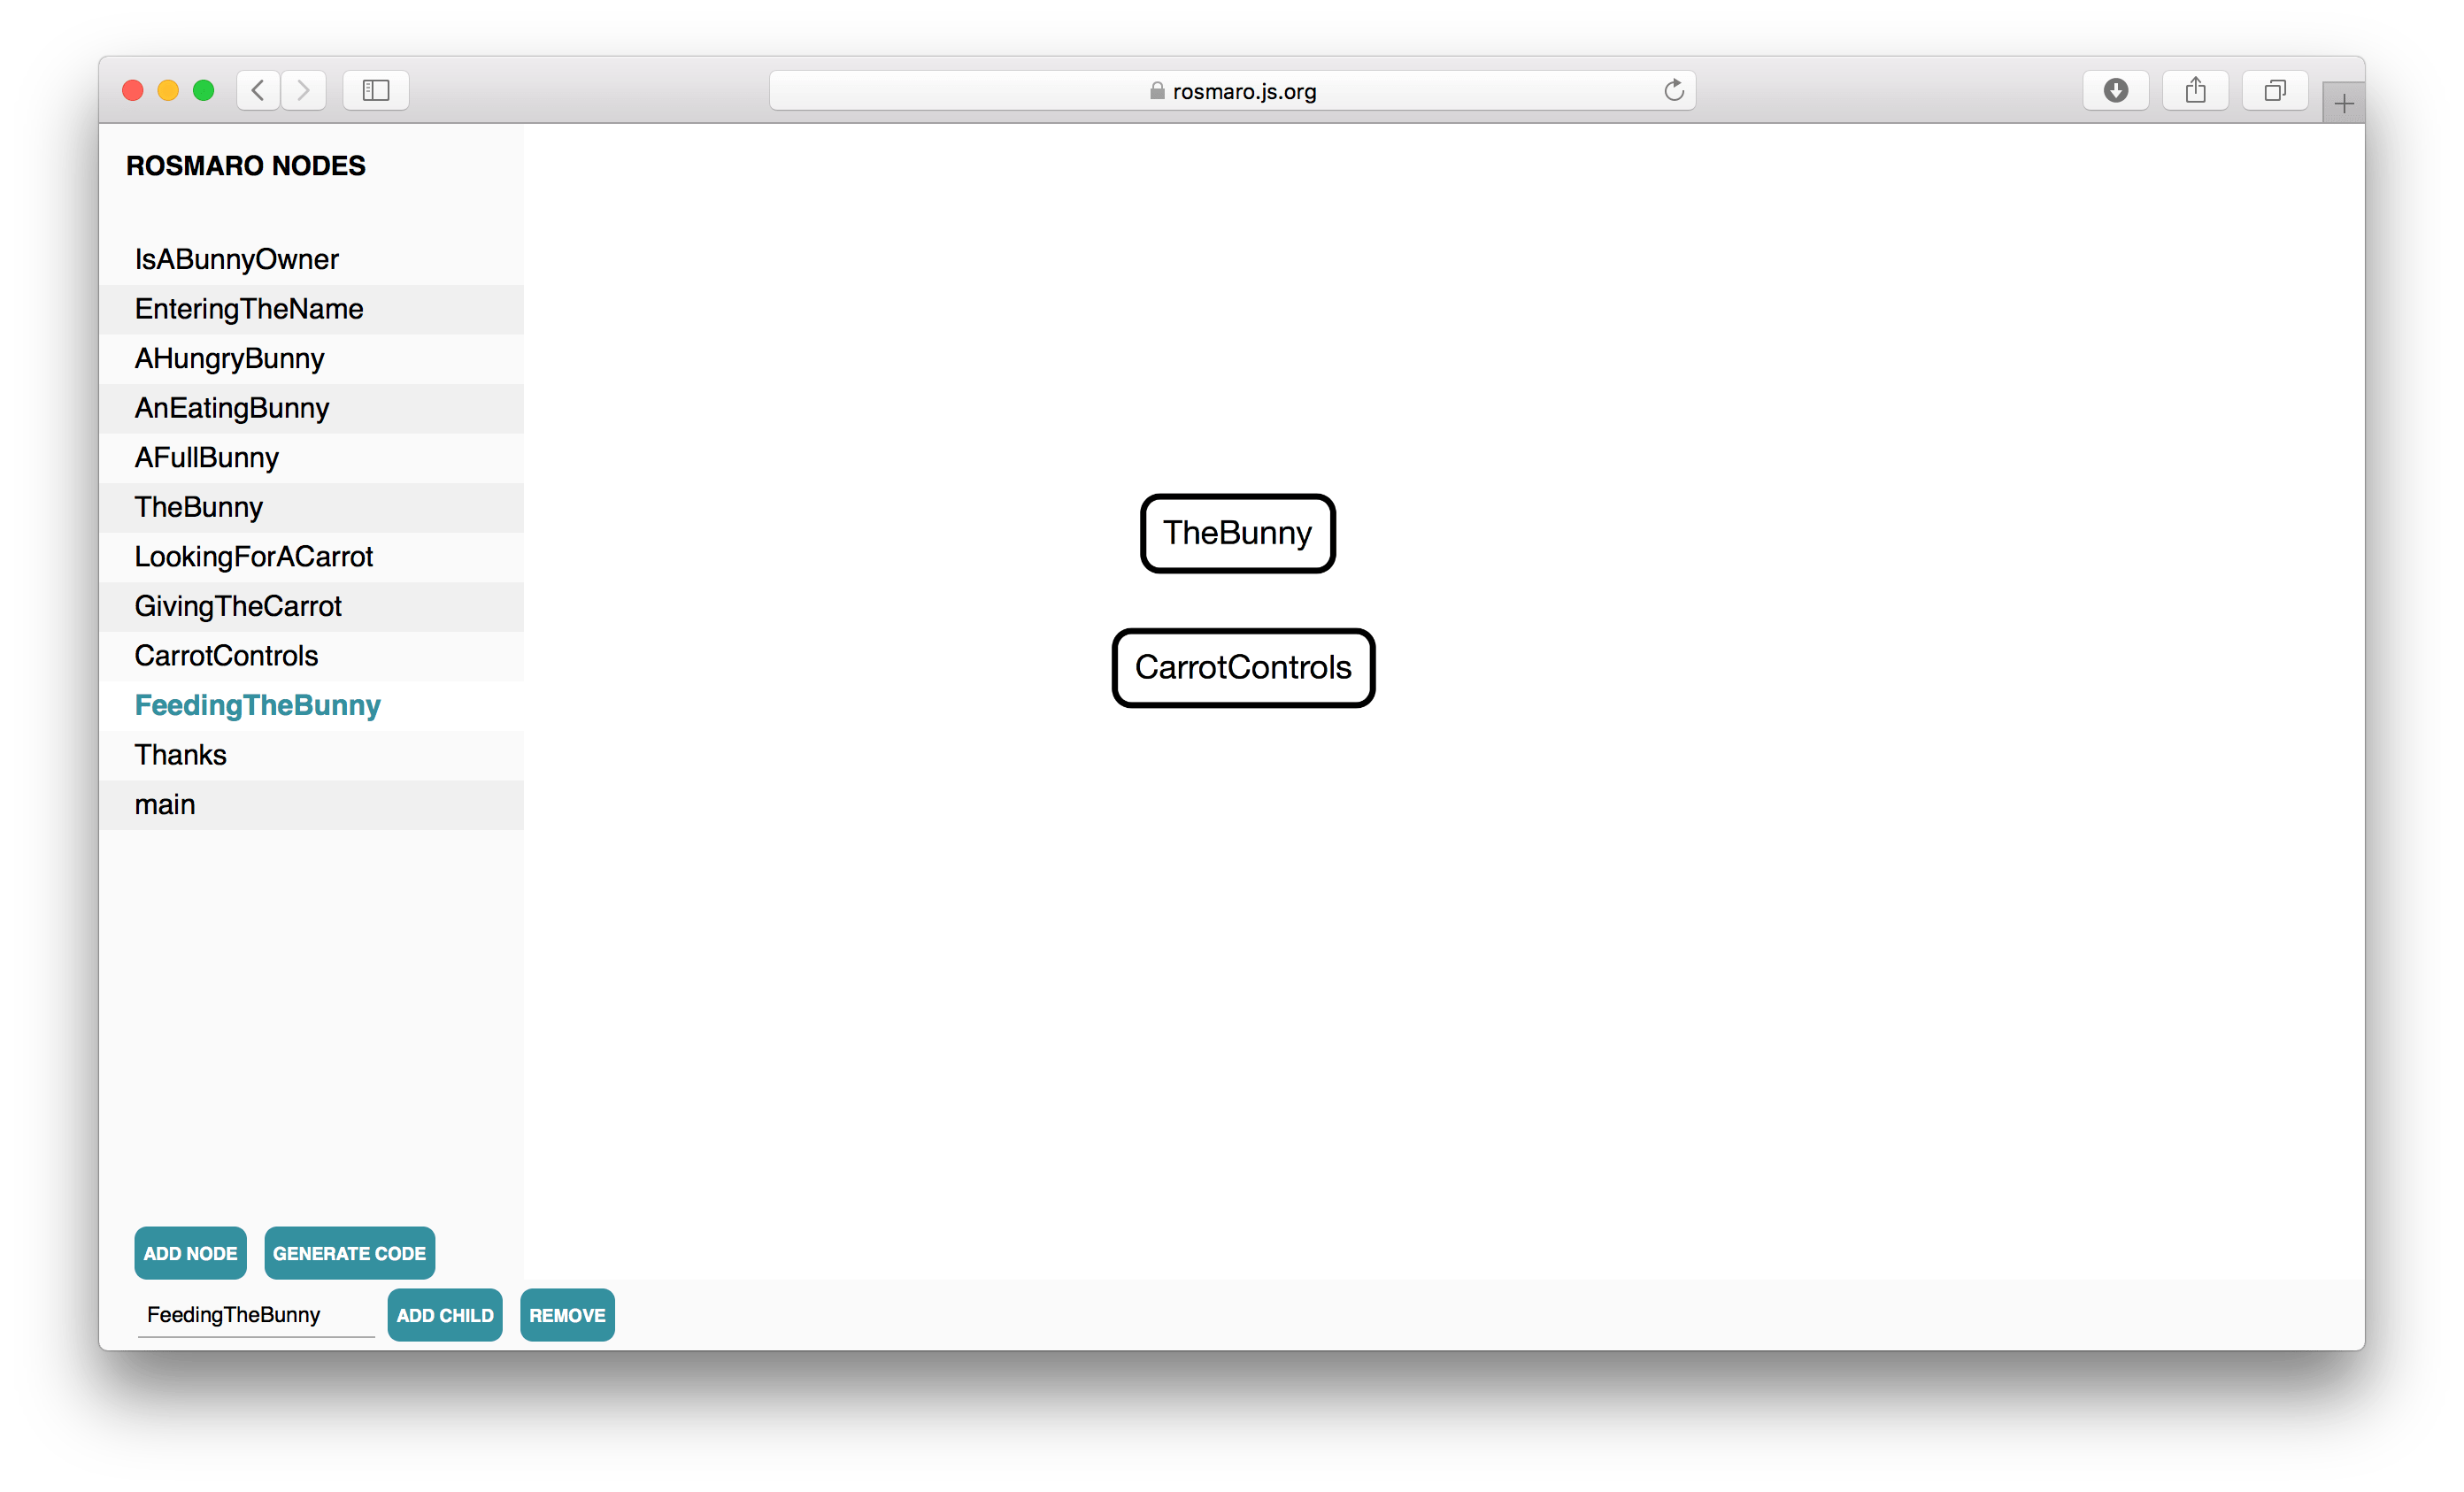
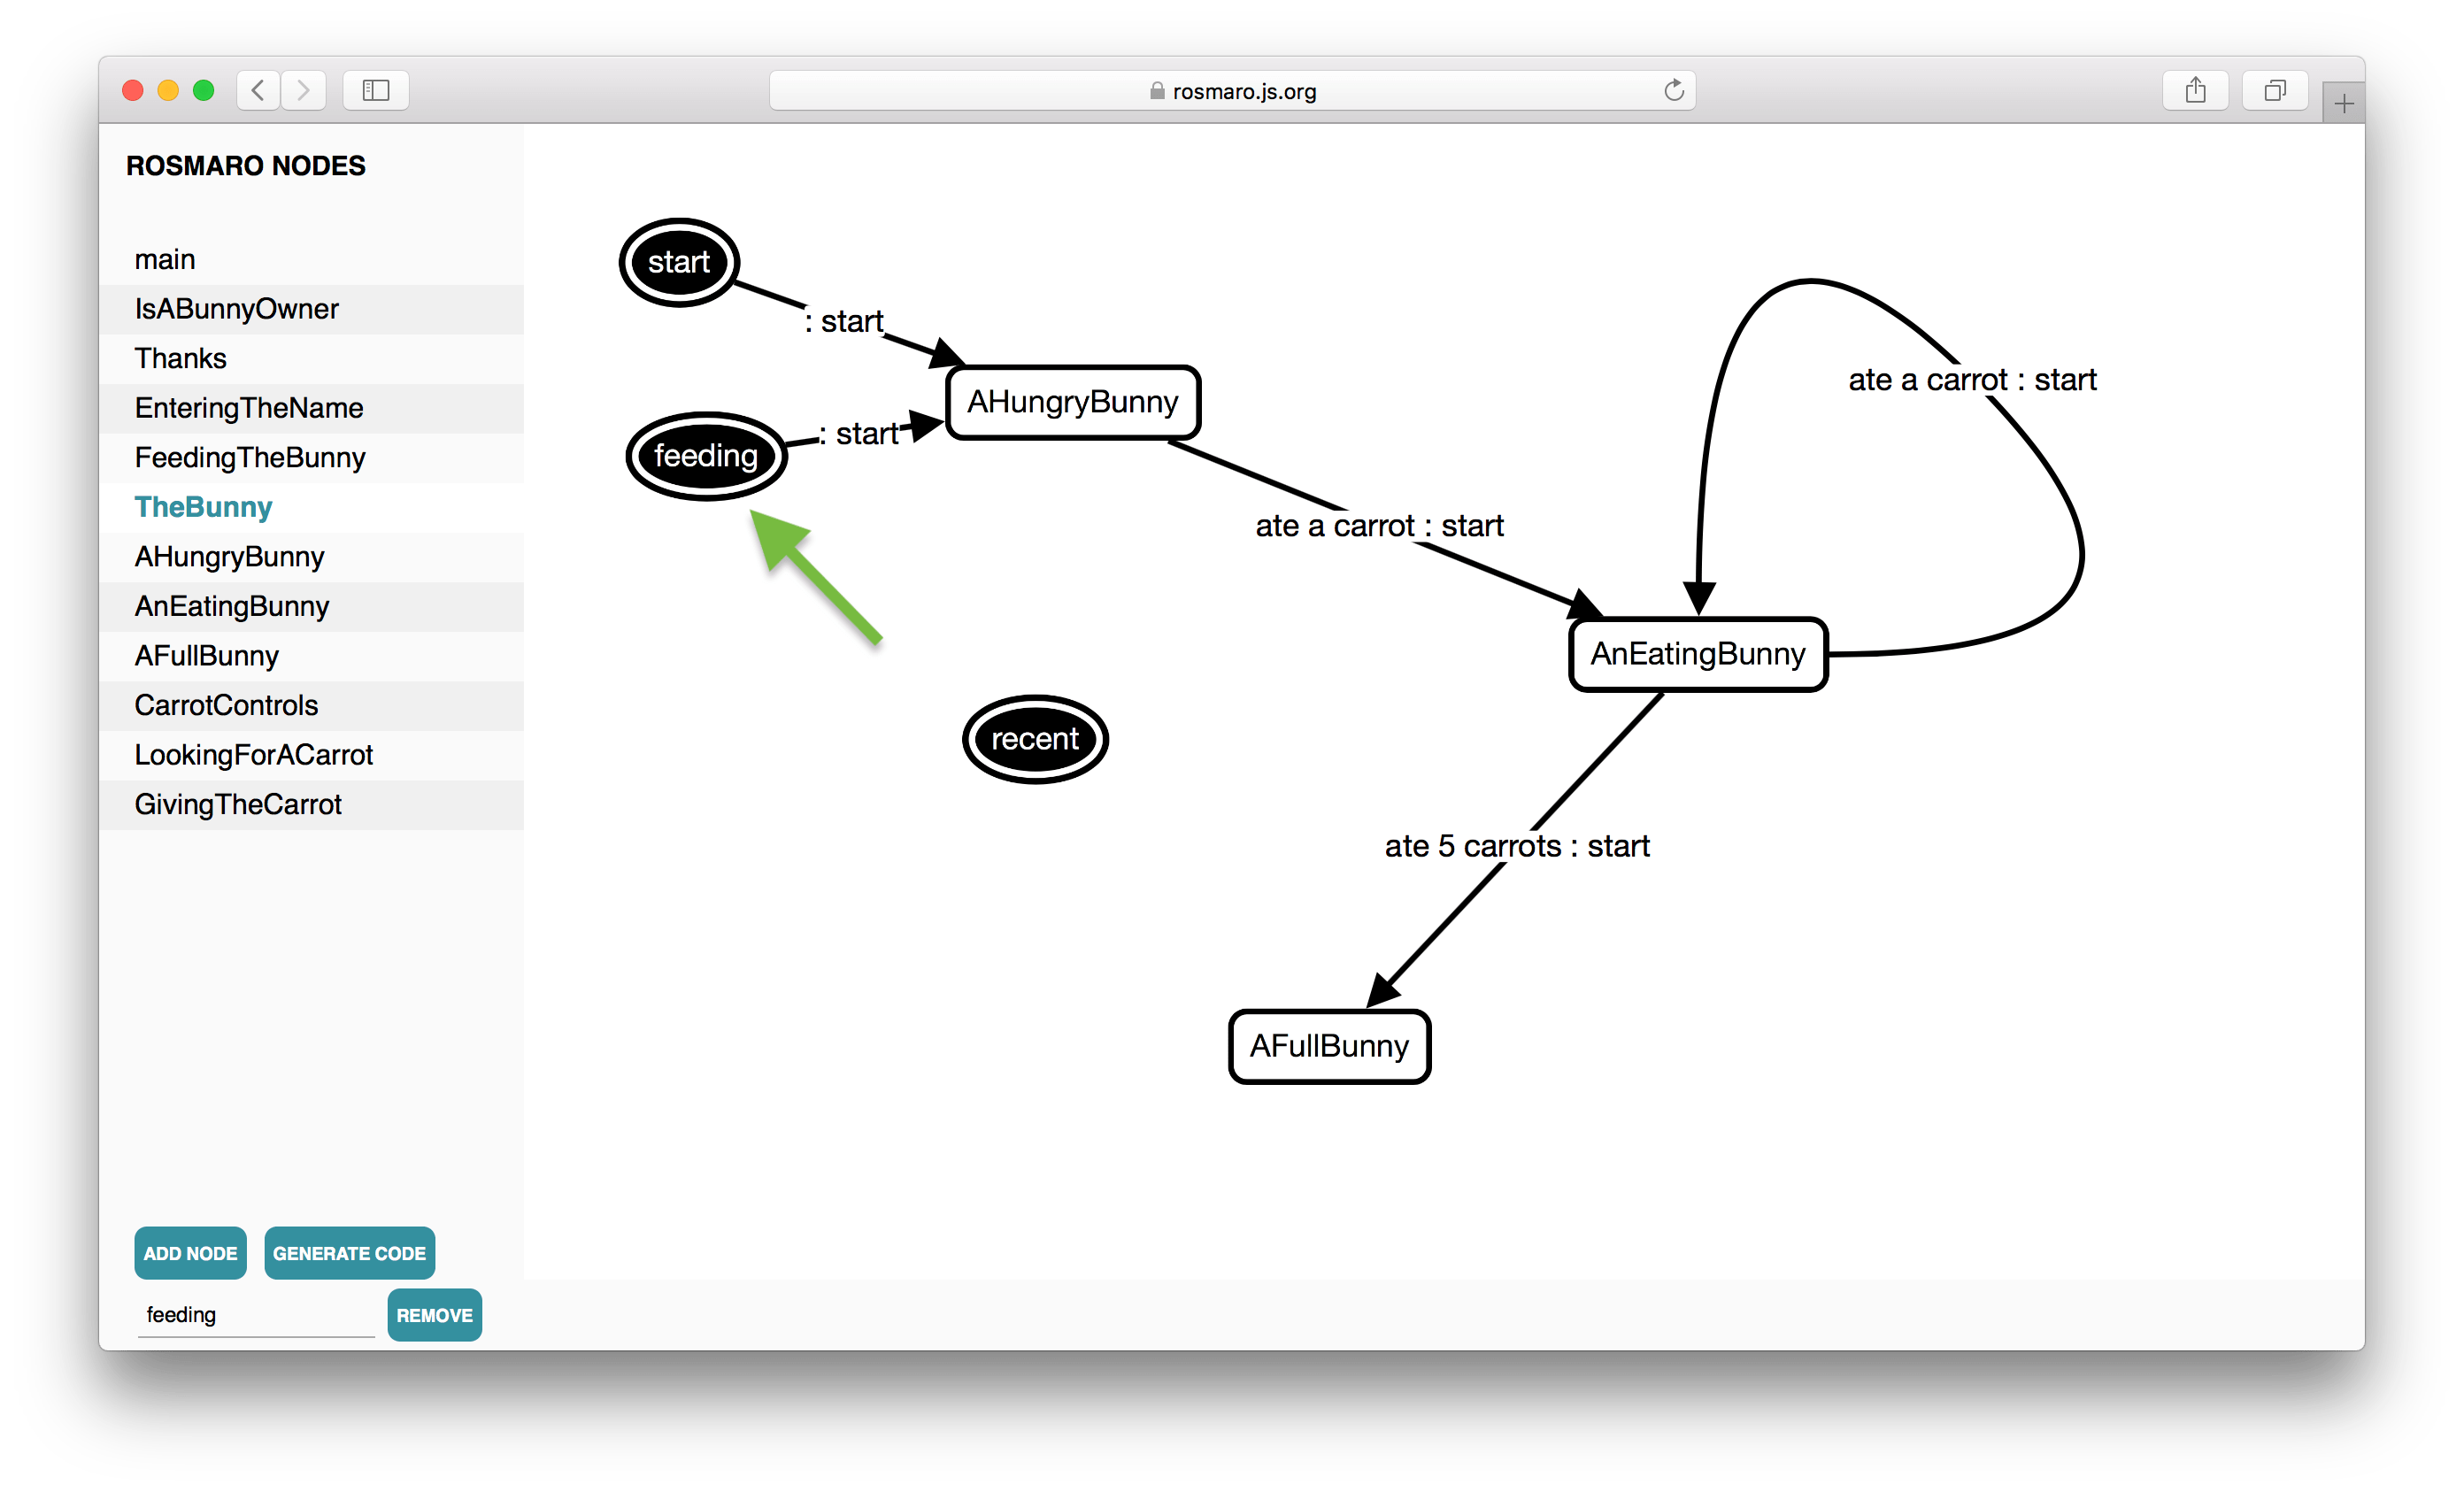
Let's start from the most important part - the bunny. It can be:
- hungry
- eating
- full
Here's how does TheBunny look.
We cannot forget about underlaying nodes. There are three of them:
- AHungryBunny
- AnEatingBunny
- AFullBunny
They are simple enough to be leaves. We add them in the same way how we added other leaves.
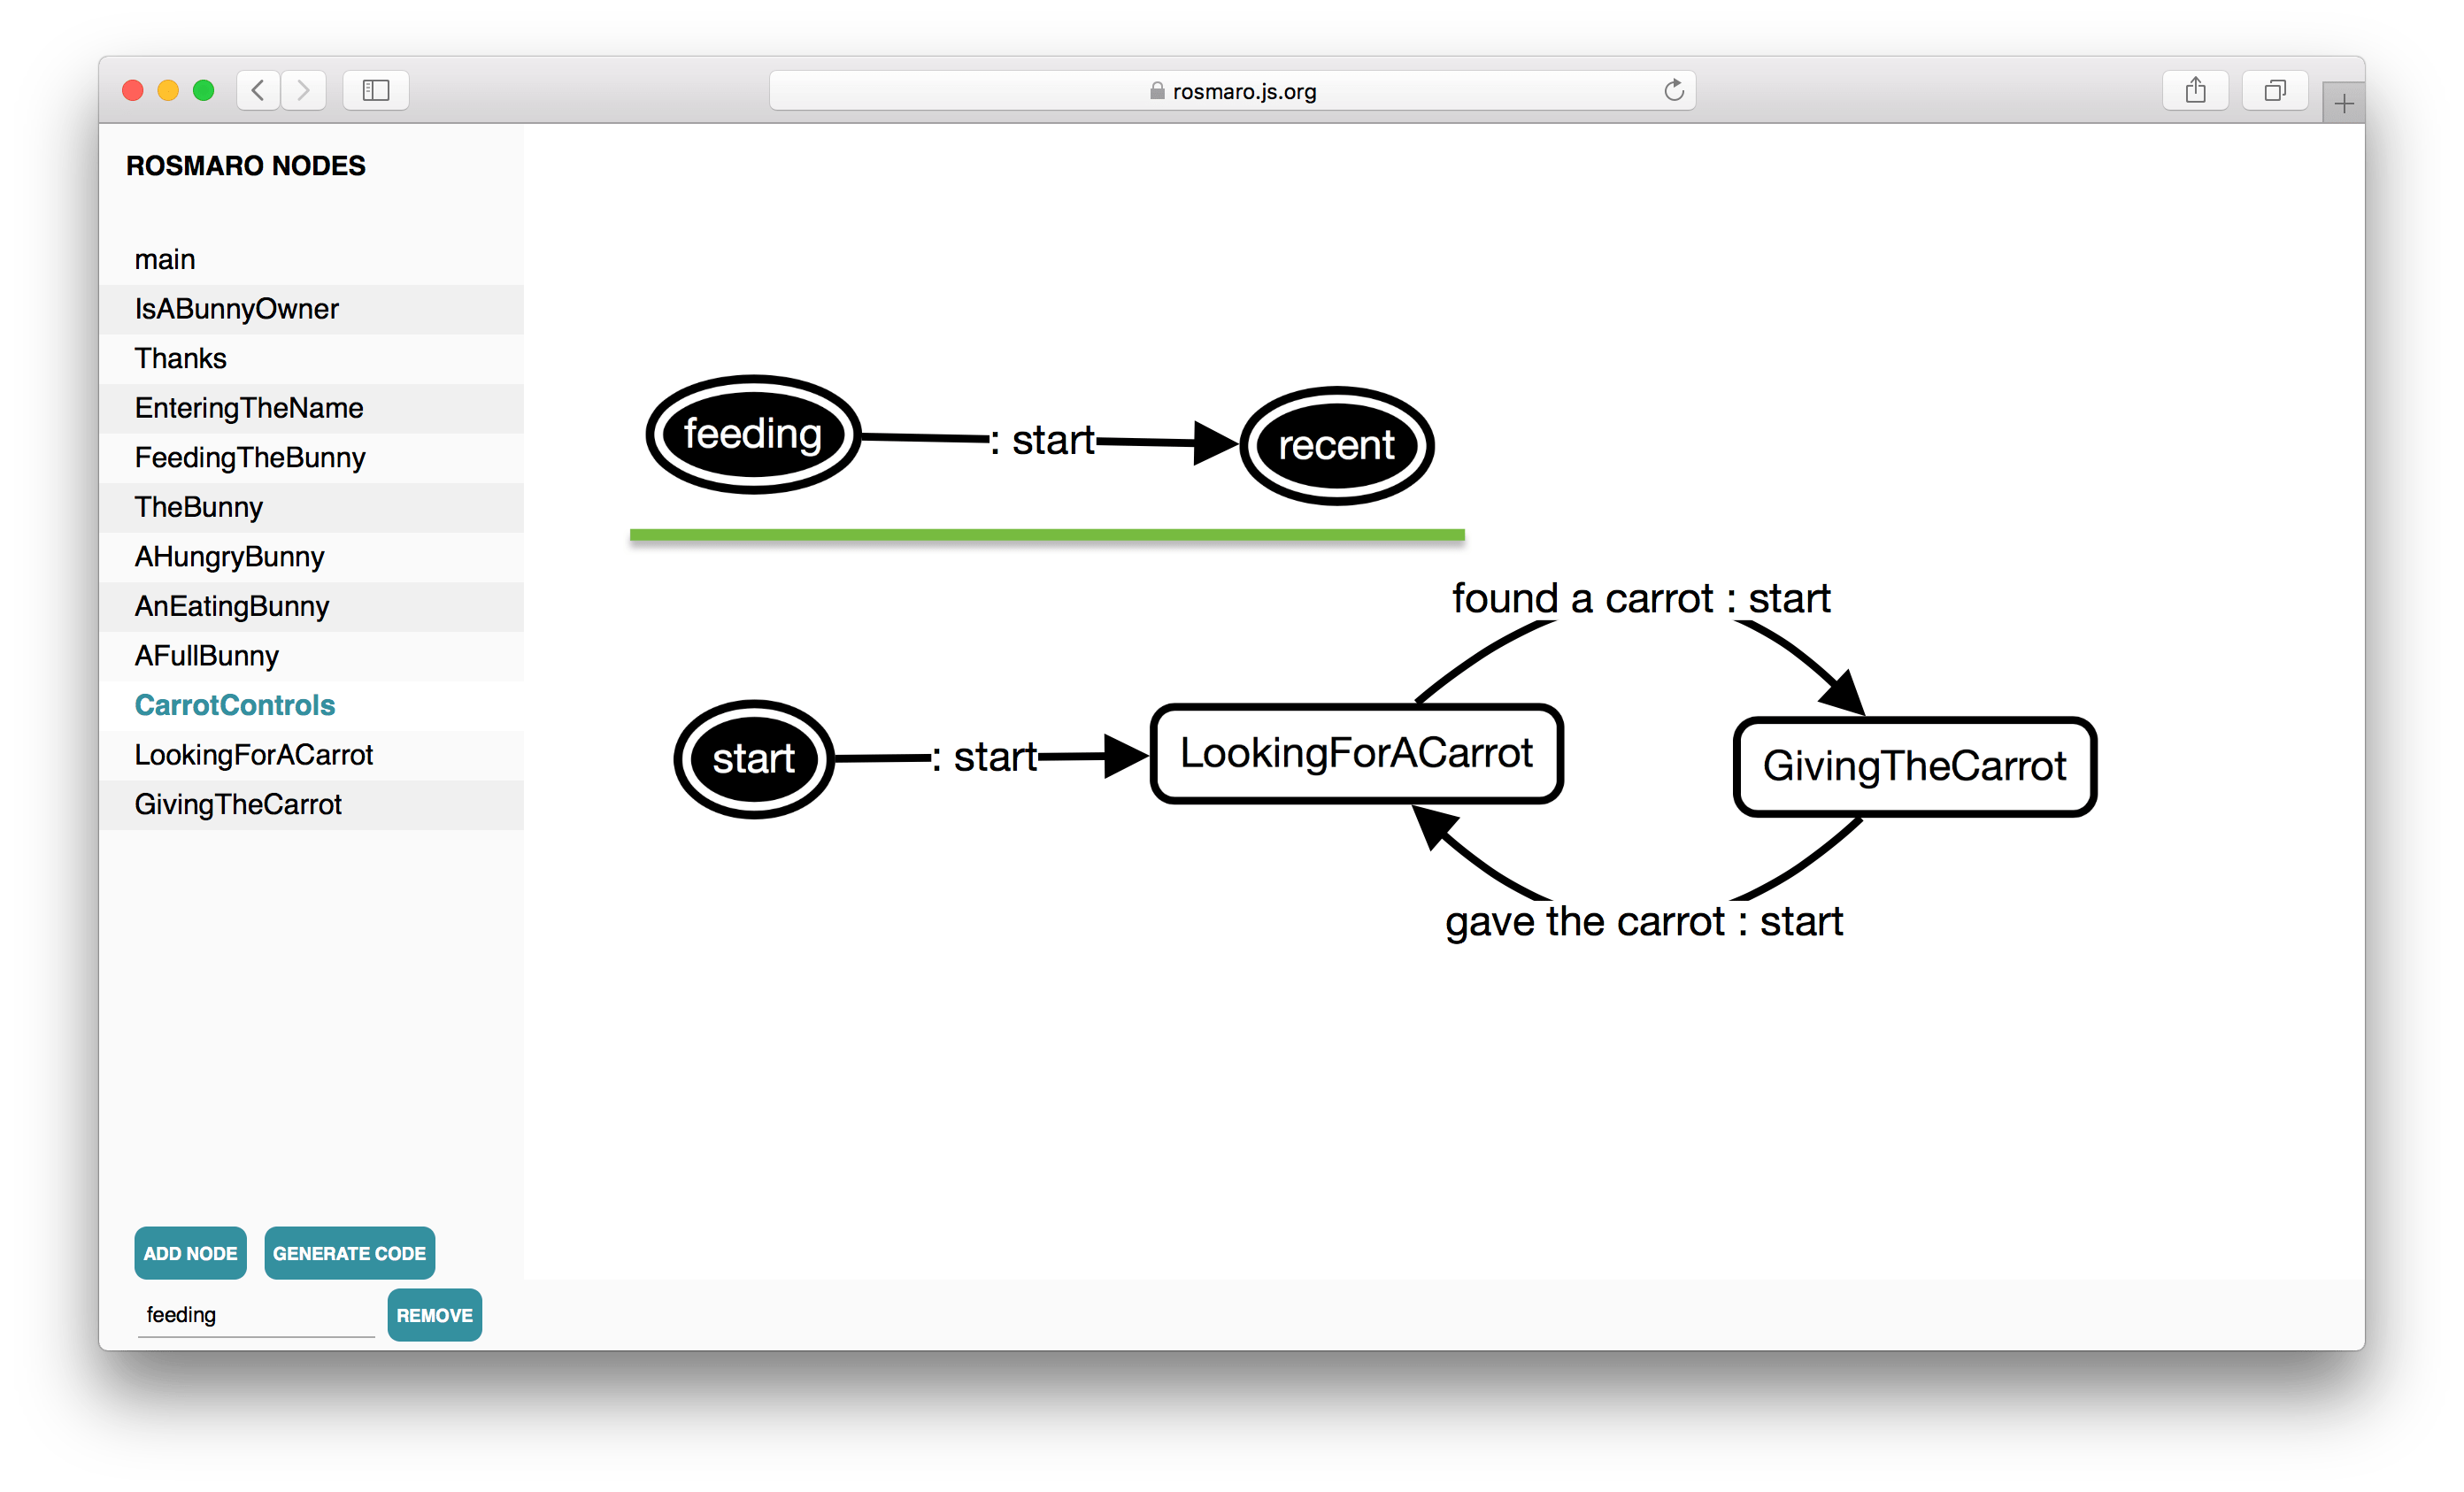
This is how CarrotControls look in the editor.
Both LookingForACarrot and GivingTheCarrot are leaves. They must be added and have their underlaying nodes selected.
At this point, all nodes and arrows are drawn. We're one click away from generating the src/graph.json file! All we need to do is to click the GENERATE CODE button.
The generated code should be saved as src/graph.json.
If for some reason you get an error saying that the code cannot be generated, please make sure that all local nodes have their underlaying nodes selected.
Coding different behaviors
After having some (I hope) good time drawing, it's time to code a bit. We're going to start from the handler of the IsABunnyOwner node. The first step is to create a handler file, which in this case is called IsABunnyOwner.js and it's located in the handlers directory.
// src/handlers/IsABunnyOwner.js

import React from 'react';

export default {

  render: () => <div>
    <p>Do you have a bunny?</p>
    <input
      type="button"
      value="Yes, I have a bunny!"
      />
    <input
      type="button"
      value="No, I don't have a bunny."
      />
  </div>

};
A quick look at its render method reveals that it gives the user a choice by displaying two buttons. Let's make sure it actually renders without crashing. We will need a test for this handler. All we need to do is to create a file called IsABunnyOwner.test.js which is located in the same directory.
// src/handlers/IsABunnyOwner.test.js

import React from 'react';
import IsABunnyOwner from './IsABunnyOwner';
import {shallow} from 'enzyme';

describe('IsABunnyOwner', () => {
  let wrapper;
  beforeEach(() => {
    wrapper = shallow(IsABunnyOwner.render());
  })

  it('renders two buttons', () => {
    expect(wrapper.find('input[type="button"]').length).toEqual(2);
  });

});
Now, when we run the following command, we can make sure that it actually renders two buttons.
npm testThe graph tells us that we expect the IsABunnyOwner node to follow either has no bunny or has a bunny arrow. Here's the complete handler code.
// src/handlers/IsABunnyOwner.js

import React from 'react';

export default {

  hasABunny: () => ({arrow: 'has a bunny'}),

  hasNoBunny: () => ({arrow: 'has no bunny'}),

  render: ({thisModel}) => <div>
    <p>Do you have a bunny?</p>
    <input
      type="button"
      value="Yes, I have a bunny!"
      onClick={() => thisModel.hasABunny()}
      />
    <input
      type="button"
      value="No, I don't have a bunny."
      onClick={() => thisModel.hasNoBunny()}
      />
  </div>

};
The render method takes a reference to the model object. It can be used to build event handlers which call methods of the Rosmaro model. In this case, the same handler that renders the UI, also handles method calls. That's why there are functions hasABunny and hasNoBunny. All they need to do is to return the arrow we want the model to follow when they're called. If you want, you can find more about this in the documentation chapter about method handlers.
And here is the test case. Please notice how Sinon spy objects are used to make sure that clicking a button actually triggers a model method.
// src/handlers/IsABunnyOwner.test.js

import React from 'react';
import IsABunnyOwner from './IsABunnyOwner';
import {shallow} from 'enzyme';
import sinon from 'sinon';

describe('IsABunnyOwner', () => {
  let wrapper, thisModel;
  beforeEach(() => {
    thisModel = {
      hasABunny: sinon.spy(),
      hasNoBunny: sinon.spy()
    };
    wrapper = shallow(IsABunnyOwner.render({thisModel}));
  })

  it('renders two buttons', () => {
    expect(wrapper.find('input[type="button"]').length).toEqual(2);
  });

  it('calls .hasABunny when "Yes, I have a bunny!" is clicked', () => {
    wrapper.find('input[value="Yes, I have a bunny!"]').simulate('click');
    expect(thisModel.hasABunny.called).toBeTruthy();
  });

  it('calls .hasNoBunny when "No, I don\'t have a bunny." is clicked', () => {
    wrapper.find('input[value="No, I don\'t have a bunny."]').simulate('click');
    expect(thisModel.hasNoBunny.called).toBeTruthy();
  });

  it('simply follows an arrow when .hasNoBunny is called', () => {
    expect(IsABunnyOwner.hasNoBunny()).toEqual({arrow: 'has no bunny'});
  });

  it('simply follows an arrow when .hasABunny is called', () => {
    expect(IsABunnyOwner.hasABunny()).toEqual({arrow: 'has a bunny'});
  });

});
When it comes to the home screen of our application, the only thing left to do is to wire the handler with the graph node. At the beginning of this article we created the src/handlers/all.js file. All it's responsible for is to provide a map connecting graph nodes with their handlers. This is how does it look with the first handler.
// src/handlers/all.js

import IsABunnyOwner from './IsABunnyOwner';

export default {
  IsABunnyOwner,
};
And that's how we finished the home screen of our app.
The node meant to enter the name, that is EnteringTheName, behaves slightly different. It not only follows arrows, but also alters the context of the Rosmaro model.
You can think of context as of something similar to state from React or store from Redux.
In order to set the default value of the user name, we're going to wire a simple handler to the main node.
// src/handlers/main.js

export default {

  initCtx: {
    name: 'Unknown person'
  }

};
The list of all handlers must be updated.
// src/handlers/all.js

// ... previously imported handlers
import main from './main';

export default {
  // ... previously exported handlers
  main,
};
Since now, every time a child of the main node reads ctx.name before the context is set to any non-empty value, it's going to read Unknown person.
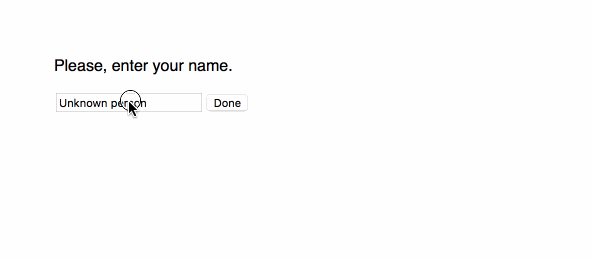
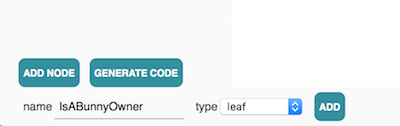
The EnteringTheName handler renders a text field and a button.
// src/handlers/EnteringTheName.js

import React from 'react';

export default {

  render: ({ctx}) => <div>
    <p>Please, enter your name.</p>
    <input
      type="text"
      value={ctx.name}
      />
    <input
      type="button"
      value="Done"
      />
  </div>

};
// src/handlers/all.js
// ... previously imported handlers
import EnteringTheName from './EnteringTheName';
export default {
// ... previously exported handlers
EnteringTheName,
};Please note how we read the name property of the context. The method is called with an object. It has a property called ctx, which is the context. We read it using object destructing.
We want to make sure the view renders without crashing and that it sets the value of the text field to the name read from the context.
// src/handlers/EnteringTheName.test.js

import React from 'react';
import EnteringTheName from './EnteringTheName';
import {shallow} from 'enzyme';
import sinon from 'sinon';

describe('EnteringTheName', () => {
  const initCtx = {name: 'Joh', another: 123};
  let wrapper, thisModel;
  beforeEach(() => {
    thisModel = {};
    wrapper = shallow(EnteringTheName.render({thisModel, ctx: initCtx}));
  })

  it('renders a text field and a button', () => {
    const field = wrapper.find('input[type="text"]');
    expect(field.length).toEqual(1);
    expect(field.props().value).toEqual('Joh');
    expect(wrapper.find('input[type="button"][value="Done"]').length).toEqual(1);
  });

});
Adding the behavior responsible for handling the Done button is very similar to what we did in order to handle buttons rendered by the IsABunnyOwner node.
// src/handlers/EnteringTheName.js

import React from 'react';

export default {

  finishEnteringTheName: () => ({arrow: 'done'}),

  render: ({thisModel, ctx}) => <div>
    <p>Please, enter your name.</p>
    <input
      type="text"
      value={ctx.name}
      />
    <input
      type="button"
      value="Done"
      onClick={() => thisModel.finishEnteringTheName()}
      />
  </div>

};
To sum it up, in order to handle a button click that makes the model follow an arrow, we need to:
- register an event listener that calls a model method
- create a model method that follows an arrow
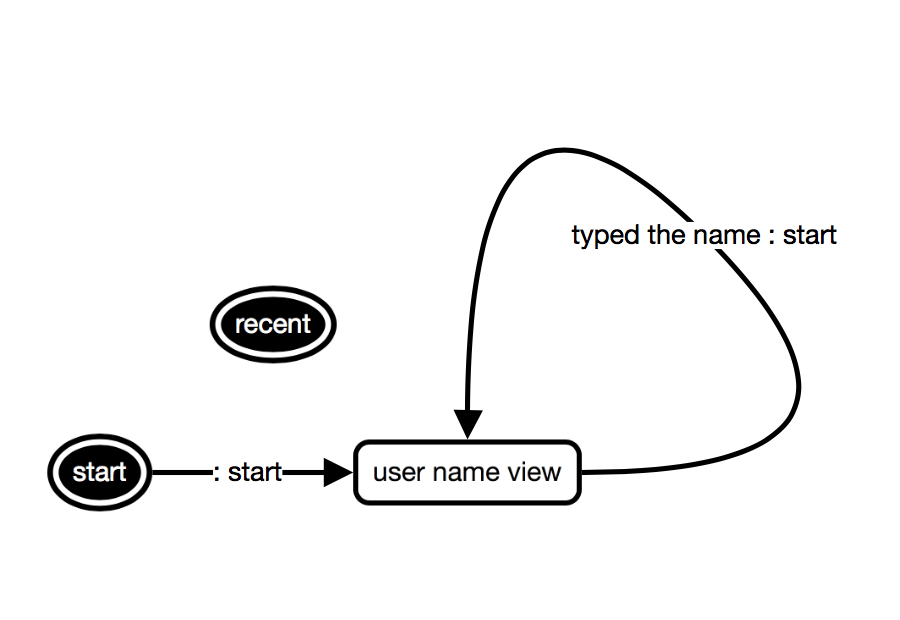
The thing that makes the EnteringTheName node more interesting than other nodes with buttons is that it handles typing on the keyboard as well. We want to let the user type her name, what means altering the name context parameter. The only way to update the context is by doing a transition. That's why we're going to need an extra arrow - to handle a situation when the name is being typed but it's not ready yet so we don't want to change the screen.
![]()
Now we can register an event listener that will call a model method meant to do a transition and set the new value of the name.
// src/handlers/EnteringTheName.js

import React from 'react';

export default {

  typeName: ({ctx, name}) => ({
    arrow: 'typed',
    ctx: {...ctx, name}
  }),

  finishEnteringTheName: () => ({arrow: 'done'}),

  render: ({thisModel, ctx}) => <div>
    <p>Please, enter your name.</p>
    <input
      type="text"
      value={ctx.name}
      onChange={e => thisModel.typeName({name: e.target.value})}
      />
    <input
      type="button"
      value="Done"
      onClick={() => thisModel.finishEnteringTheName()}
      />
  </div>

};
The most common mistake I make writing handlers like this is to replace the whole context instead of updating just one field. Let's take a look at its test case.
// src/handlers/EnteringTheName.test.js

import React from 'react';
import EnteringTheName from './EnteringTheName';
import {shallow} from 'enzyme';
import sinon from 'sinon';

describe('EnteringTheName', () => {
  const initCtx = {name: 'Joh', another: 123};
  let wrapper, thisModel;
  beforeEach(() => {
    thisModel = {
      // ...
    };
    wrapper = shallow(EnteringTheName.render({thisModel, ctx: initCtx}));
  })

  // ...

  it('updates the name when .typeName is called', () => {
    expect(EnteringTheName.typeName({ctx: initCtx, name: 'John'})).toEqual({
      arrow: 'typed',
      ctx: {name: 'John', another: 123}
    });
  });

});
If you were wondering what's the point of the {another: 123} part of the context, this is the answer - to make sure it's not accidentally removed. This handler is meant to update the name property. It shouldn't touch other properties. There's one more thing about the EnteringTheName node I'd like to mention about. Let's have a look at the main graph one more time.
As we can see, when the name is entered, the user lands on either the FeedingTheBunny screen or the Thanks screen. What's cool is that the code responsible for handling the Done button always does the same - it makes the model follow an arrow called done. There is no IF for that. It's not parametrized using a boolean flag neither. It's all about where is the arrow pointing at.
We're getting closer to the most complicated part which is the FeedingTheBunny node and its children. The node itself is a composite of two nodes: TheBunny and CarrotControls. Both of those nodes handle the render method in their own ways. In order to make the composite render correctly, we need to make its render method return a merged result of the render method of TheBunny and the render method of CarrotControls. This is how we can use altering results to achieve this.
// src/handlers/FeedingTheBunny.js

import React from 'react';

export default {

  afterRender: ({res}) => <div>
    {res.TheBunny}
    <hr/>
    {res.CarrotControls}
  </div>

};
// src/handlers/all.js
// ... previously imported handlers
import FeedingTheBunny from './FeedingTheBunny';
export default {
// ... previously exported handlers
FeedingTheBunny,
};This is its test case.
// src/handlers/FeedingTheBunny.test.js
import React from 'react';
import FeedingTheBunny from './FeedingTheBunny';
import {shallow} from 'enzyme';
import sinon from 'sinon';
describe('FeedingTheBunny', () => {
it('renders the bunny and carrot controls', () => {
const wrapper = shallow(FeedingTheBunny.afterRender({
res: {
TheBunny: <span id="the-bunny" />,
CarrotControls: <span id="carrot-controls" />,
}
}));
expect(wrapper.find('#the-bunny').length).toEqual(1);
expect(wrapper.find('#carrot-controls').length).toEqual(1);
});
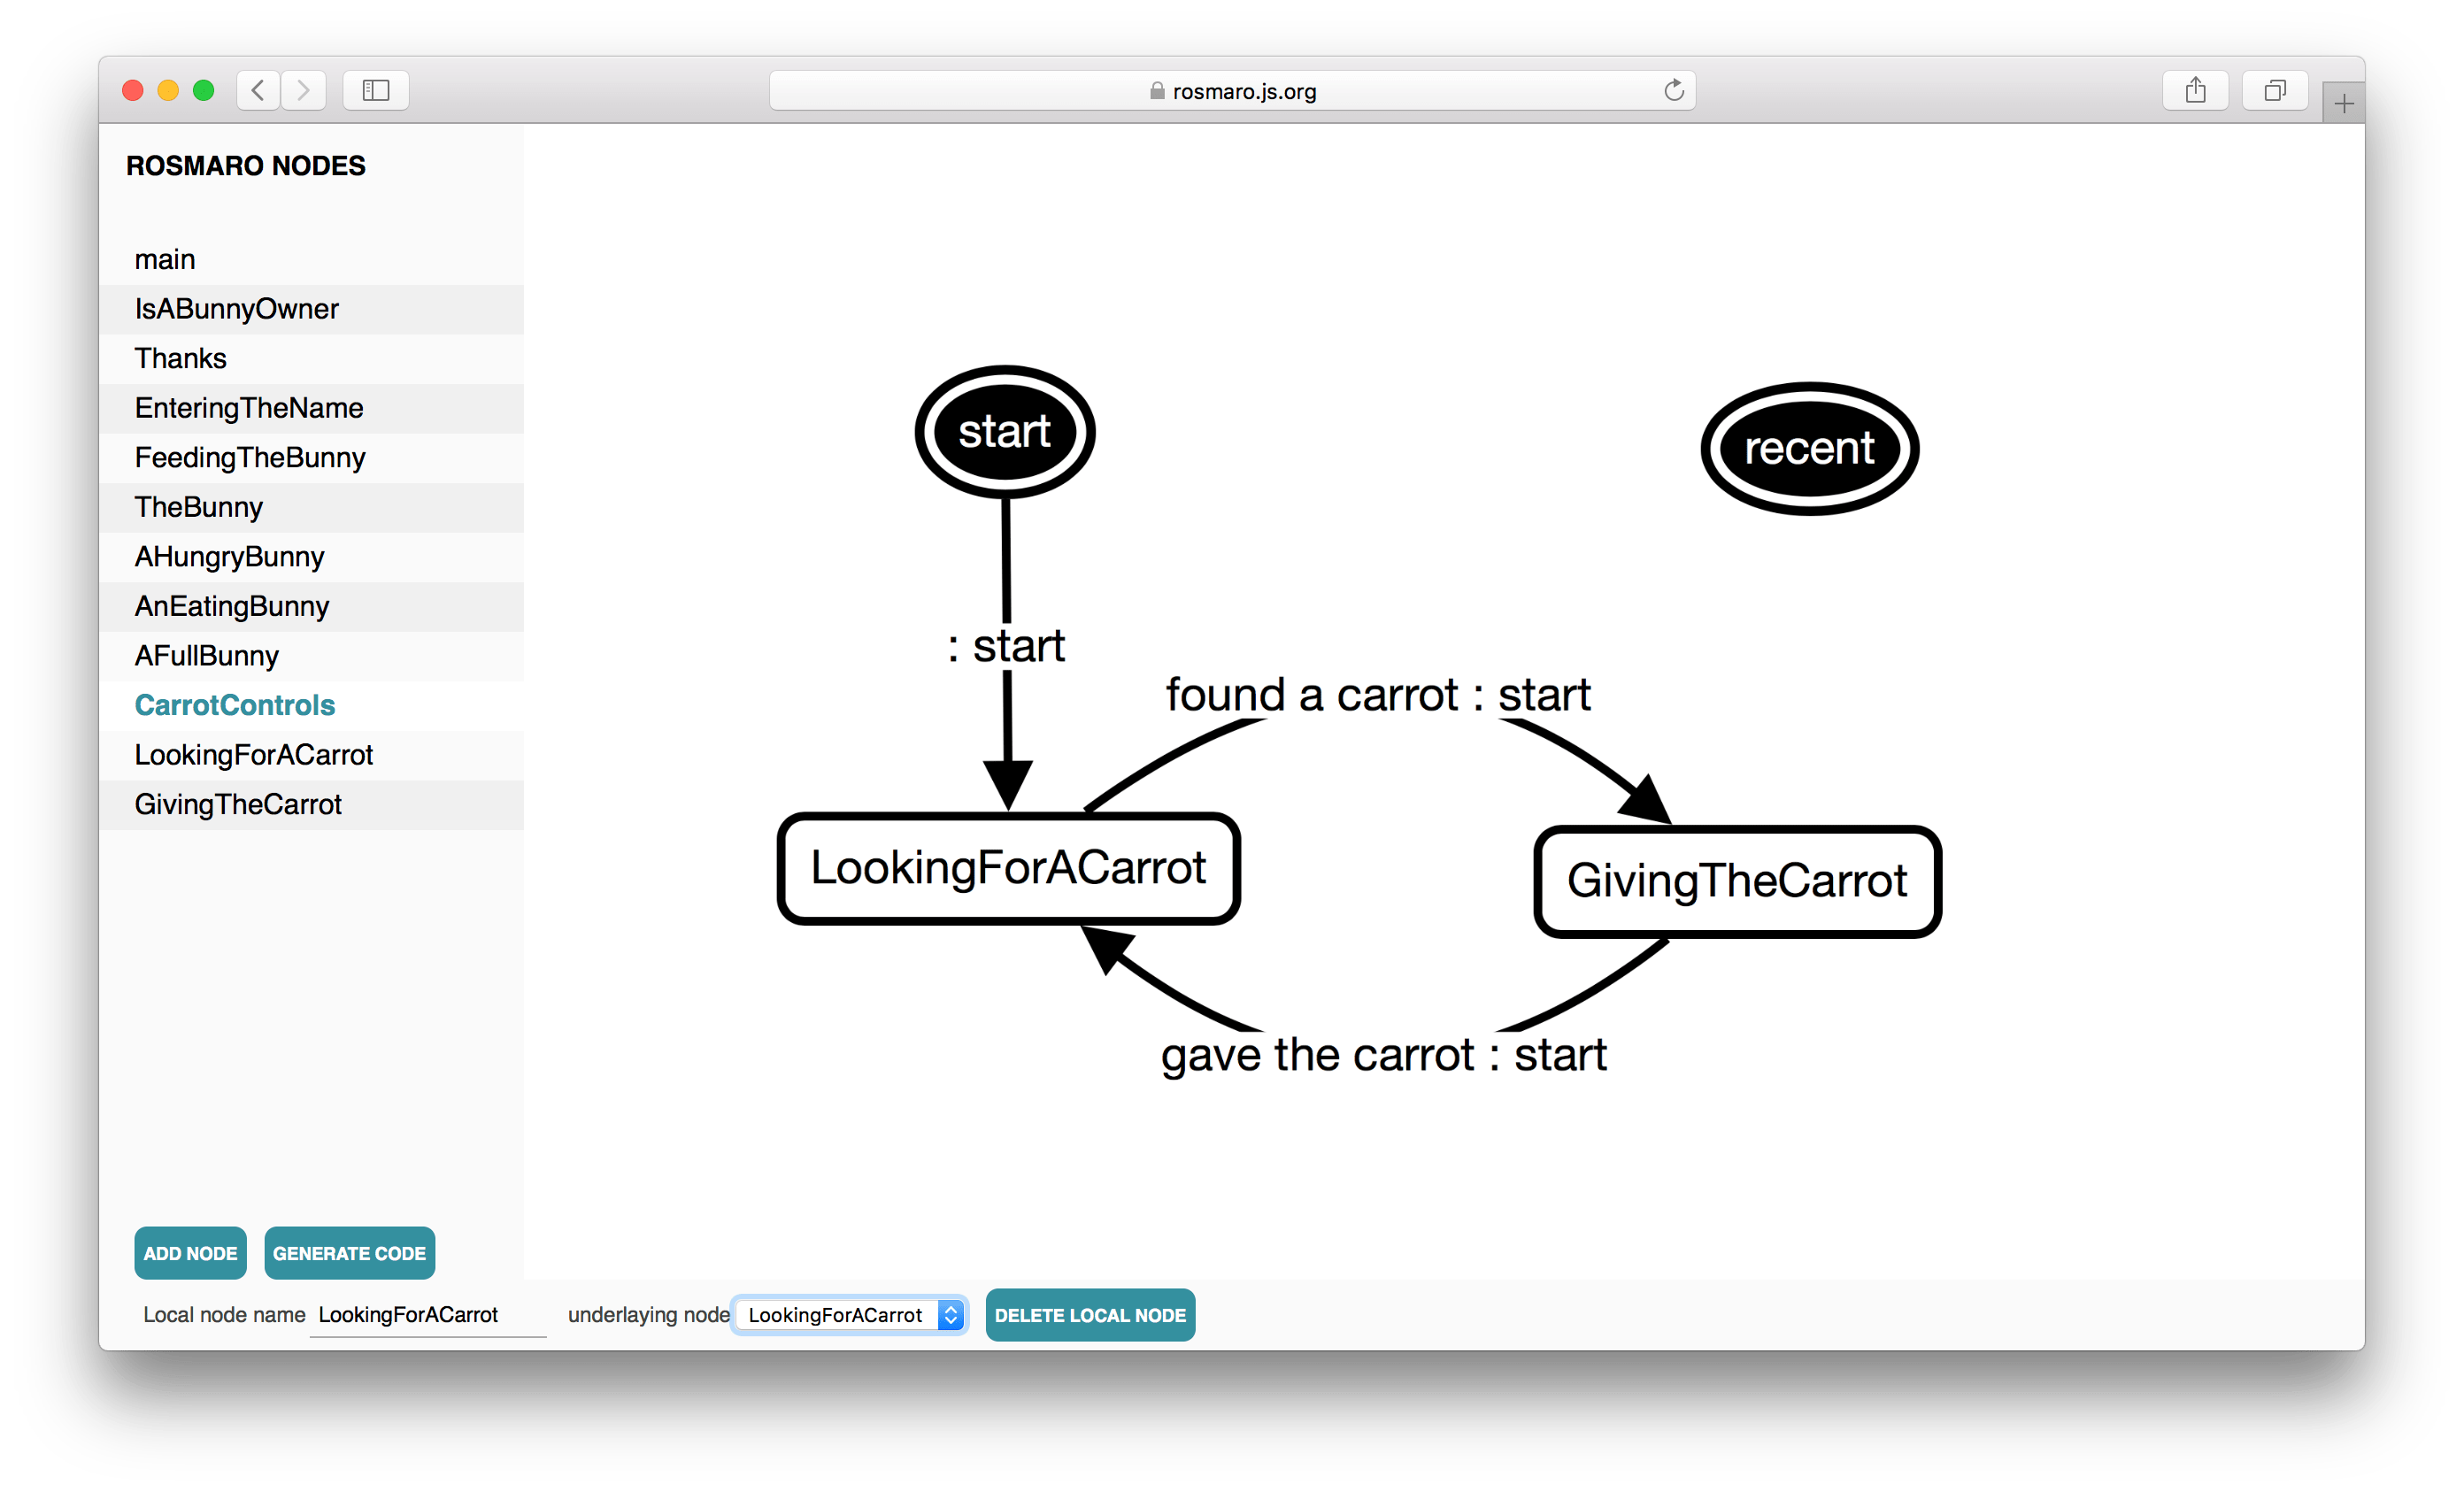
});We're going to start from the CarrotControls graph. What makes it special is that it calls model methods which are handled by two handlers:
- the controls themselves (when we give a carrot away, we don't have it anymore)
- the bunny (when the bunny is given a carrot, it's not hungry anymore) First, let's do the controls.
// src/handlers/LookingForACarrot.js

import React from 'react';

export default {

  lookForACarrot: () => ({arrow: 'found a carrot'}),

  render: ({thisModel}) => <div>
    <p>You don not have a carrot to give to your bunny.</p>
    <input
      type="button"
      value="Look for a carrot"
      onClick={() => thisModel.lookForACarrot()}
      />
  </div>

};
// src/handlers/GivingTheCarrot.js
import React from 'react';
export default {
giveTheCarrot: () => ({arrow: 'gave the carrot'}),
render: ({thisModel}) => <div>
<p>You have a carrot. You can give it to your bunny.</p>
<input
type="button"
value="Give the carrot"
onClick={() => thisModel.giveTheCarrot()}
/>
</div>
};// src/handlers/all.js
// ... previously imported handlers
import LookingForACarrot from './LookingForACarrot';
import GivingTheCarrot from './GivingTheCarrot';
export default {
// ... previously exported handlers
LookingForACarrot,
GivingTheCarrot,
};These buttons simply change between Look for a carrot and Give the carrot. They do it by calling model methods like giveTheCarrot. And I must tell you a secret - TheBunny is especially interested in getting a carrot.
To make TheBunny children a bit simpler, we're going to give them just a slice of the whole context. The whole context looks like this.
{
  name: 'Łukasz',
  bunny: {ateCarrots: 3}
}
But we want TheBunny and its children to see just this.
{
  ateCarrots: 3
}
It turns out to be very easy with context slices. All we need to do is to write a simple handler for TheBunny.
// src/handlers/TheBunny.js

export default {
  ctxSlice: 'bunny'
};
// src/handlers/all.js
// ... previously imported handlers
import TheBunny from './TheBunny';
export default {
// ... previously exported handlers
TheBunny,
};Now we can create AHungryBunny. It will handle the same method call which makes the controls change from GiveTheCarrot to LookingForACarrot, that is giveTheCarrot.
// src/handlers/AHungryBunny.js

import React from 'react';

export default {

  giveTheCarrot: ({ctx}) => ({
    arrow: 'ate a carrot',
    ctx: {
      ...ctx,
      ateCarrots: 1
    }
  }),

  render: () => <p>
    <span role="img" aria-label="A hungry bunny">🐰</span>
    This is a hungry bunny.
  </p>

};
// src/handlers/all.js
// ... previously imported handlers
import AHungryBunny from './AHungryBunny';
export default {
// ... previously exported handlers
AHungryBunny,
};Every time we call the giveTheCarrot method, the node called GivingTheCarrot follows the arrow called gave the carrot and the node called AHungryBunny follows the arrow called ate a carrot (and sets the number of ate carrots to 1).
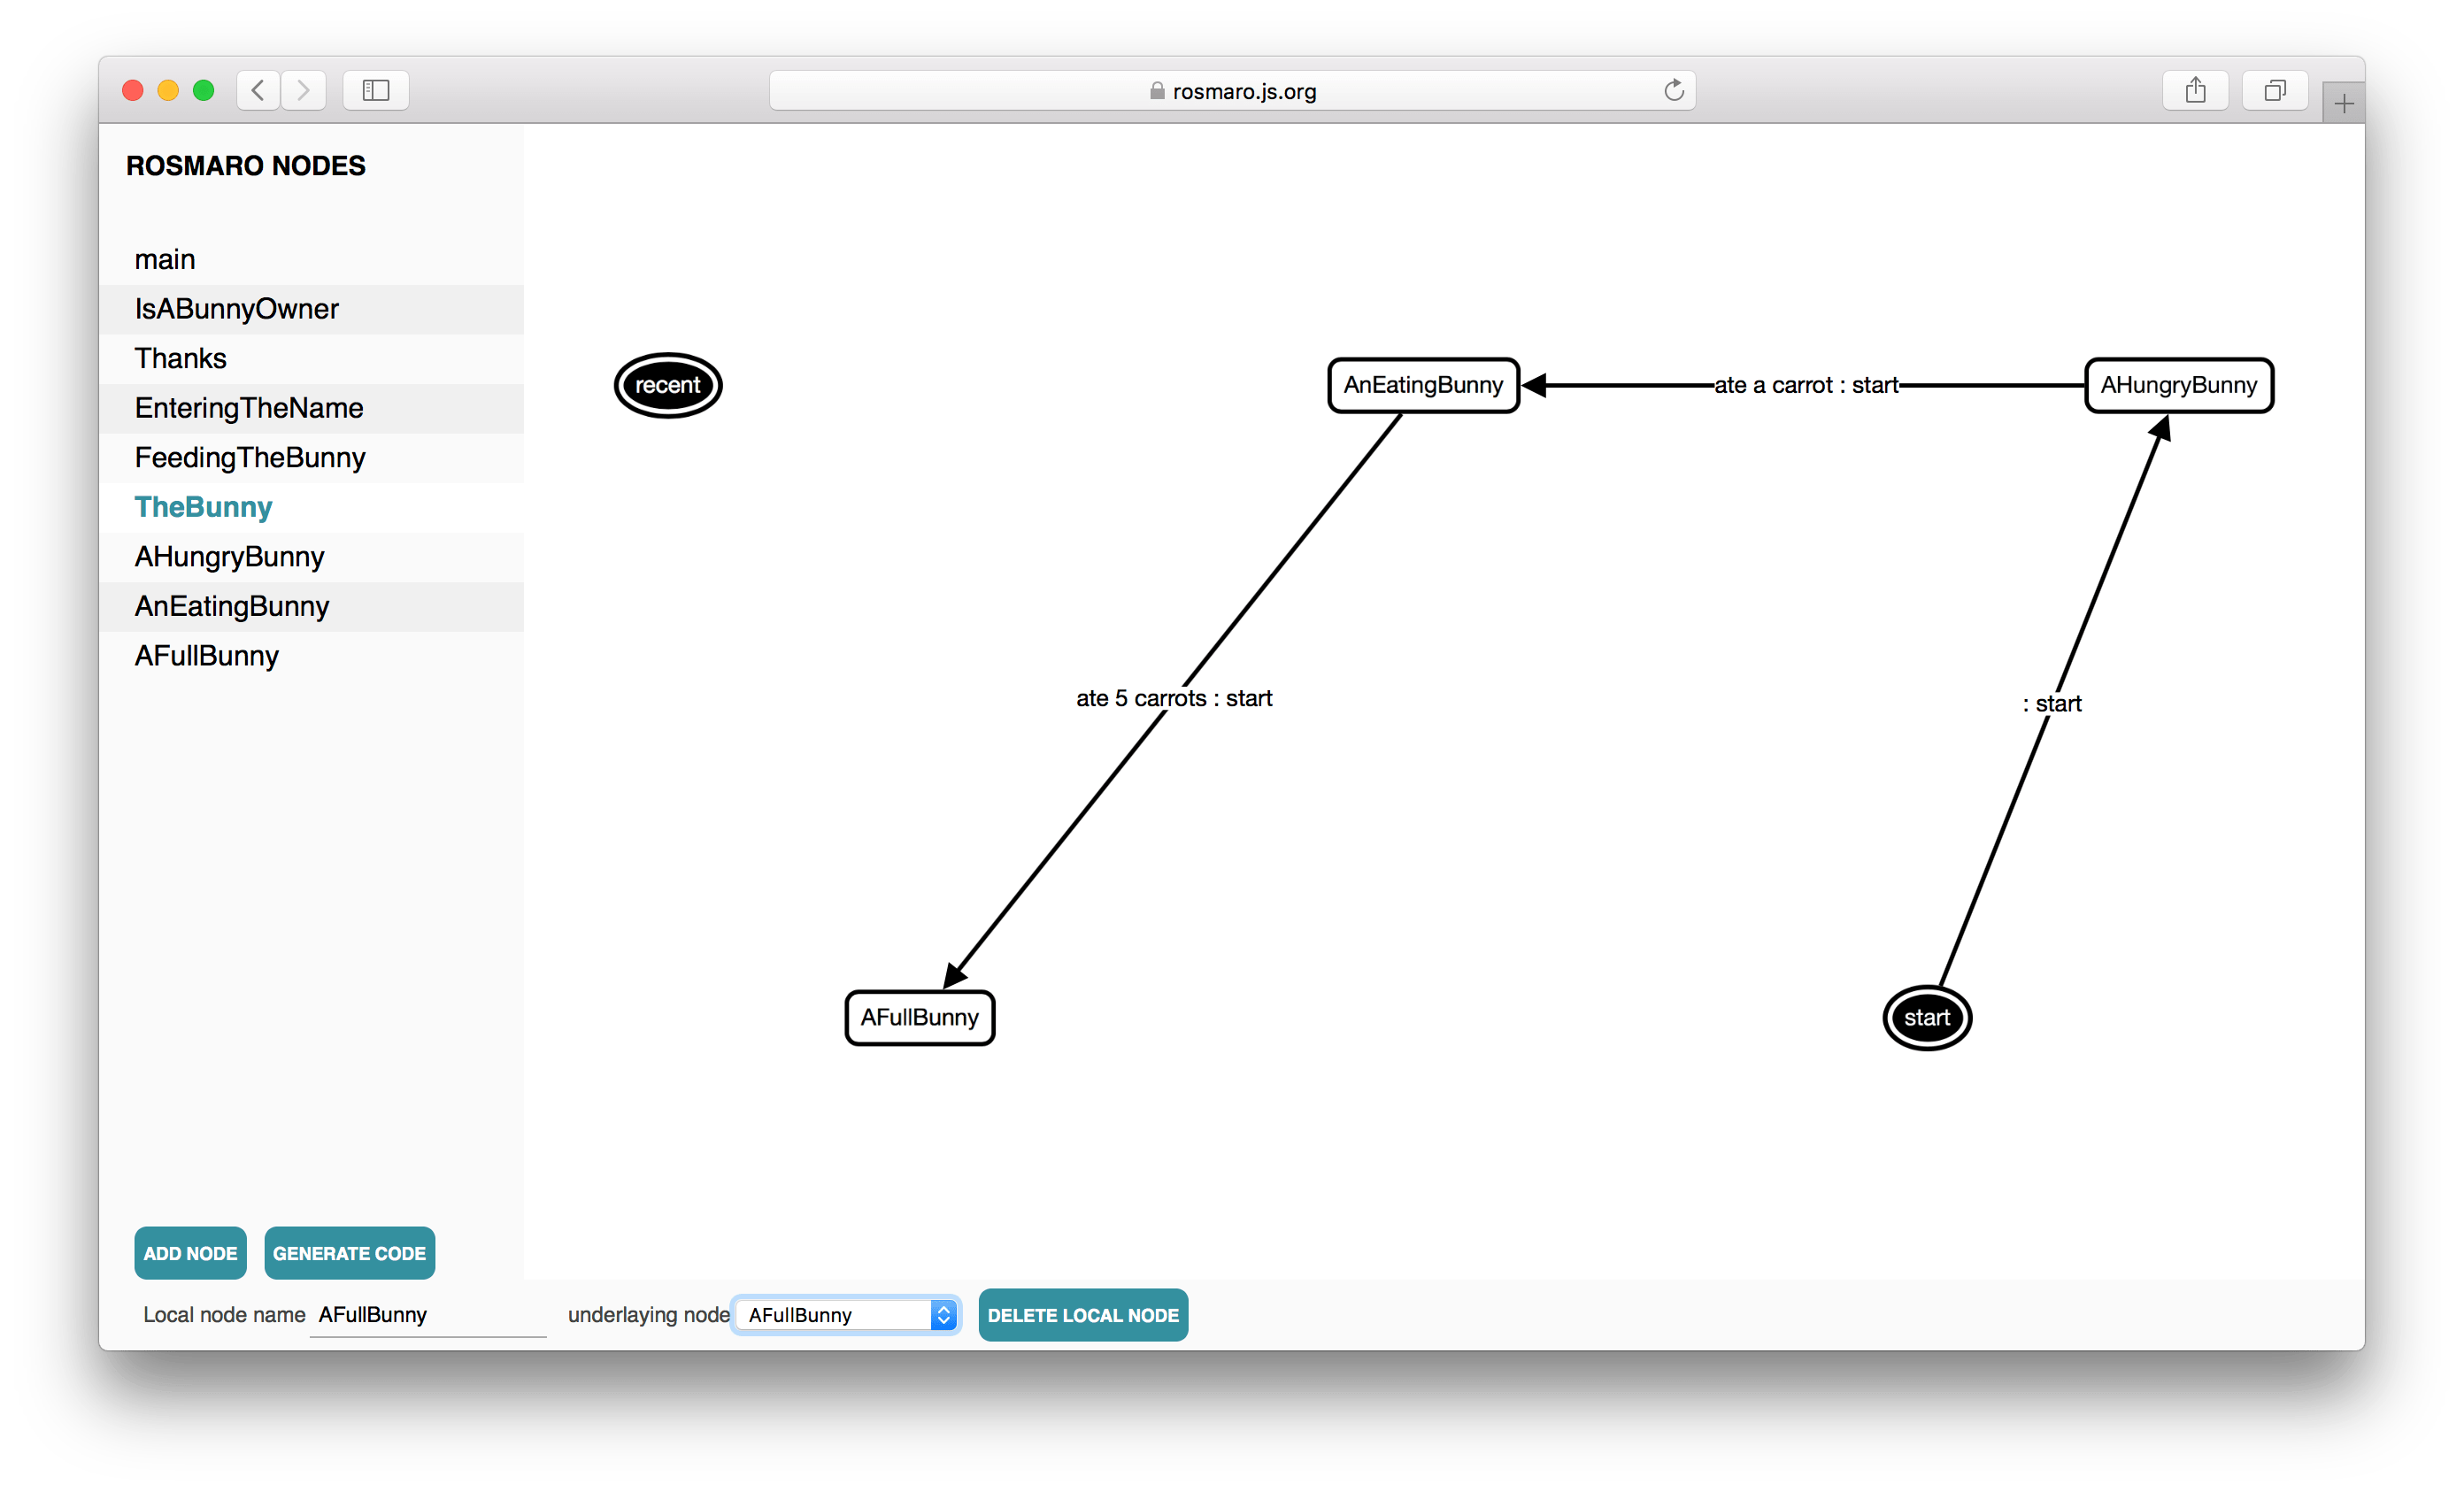
When AHungryBunny eats a carrot it becomes AnEatingBunny.
// src/handlers/AnEatingBunny.js

import React from 'react';

export default {

  giveTheCarrot: ({ctx}) => {
    const ateCarrots = ctx.ateCarrots + 1;
    const arrow = ateCarrots >= 5
      ? 'ate 5 carrots'
      : 'ate a carrot';
    return {
      arrow,
      ctx: {
        ...ctx,
        ateCarrots
      }
    };
  },

  render: () => <p>
    <span role="img" aria-label="A bunny">🐰</span>
    <span role="img" aria-label="A carrot">🥕</span>
    This is an eating bunny.
  </p>

};
// src/handlers/all.js
// ... previously imported handlers
import AnEatingBunny from './AnEatingBunny';
export default {
// ... previously exported handlers
AnEatingBunny,
};Every time it's given a carrot, it increments the number of ate carrots by 1 (what's actually done by returning a new version of the context, very much like in Redux). What makes it different than any other handler we implemented is that it picks the arrow to follow based upon the context of the model. If the bunny has eaten at least 5 carrots, it follows the ate 5 carrots arrow. However, if the bunny ate less than 5 carrots, it just updates the number of ate carrots. It accomplishes this by following a different arrow called ate a carrot. It is very much like the EnteringTheName node which follows the typed arrow in order to update the context. That's why we need to add this arrow to the graph.
![]()
Finally, AFullBunny is happy and allows us to go back to what we were doing.
// src/handlers/AFullBunny.js

import React from 'react';

export default {

  go: () => ({arrow: 'fed the bunny'}),

  render: ({thisModel}) => <div>
    <p>
      <span role="img" aria-label="A full bunny">🐰</span>
      <span role="img" aria-label="Fireworks">🎆</span>
      The bunny is full. You can go.
    </p>
    <input
      type="button"
      value="Go!"
      onClick={() => thisModel.go()}
      />
  </div>

};
// src/handlers/all.js
// ... previously imported handlers
import AFullBunny from './AFullBunny';
export default {
// ... previously exported handlers
AFullBunny,
};The last screen is called Thanks and it simply says "thank you" and lets us to start the whole process one more time.
// src/handlers/Thanks.js

import React from 'react';

export default {

  repeat: () => ({arrow: 'repeated'}),

  render: ({ctx, thisModel}) => <div>
    <p>Thanks, {ctx.name}!</p>
    <input
      type="button"
      value="One more time!"
      onClick={() => thisModel.repeat()}
      />
  </div>

};
// src/handlers/all.js
// ... previously imported handlers
import Thanks from './Thanks';
export default {
// ... previously exported handlers
Thanks,
};The application is almost ready. The missing functionality is about TheBunny being hungry every time we see it, while the state of CarrotControls should never change without user interaction. It means that if we leave the bunny full and we have a carrot (let's imagine we're carrying it in a bag), then the bunny is hungry when we meet it again but we don't need to look for another carrot because we already have one (the one we found previously). Implementing this feature is actually quite easy and can be done just by editing the graph. First, let's use a special entry point to FeedingTheBunny. We're going to call it feeding. All we need to do is to open the main graph, click the fed the bunny arrow and change its entry point from start to feeding.
Since now, every subgraph of the FeedingTheBunny must have an entry point called feeding. So let's start with TheBunny, which is always hungry when it comes to feeding it.
- Open TheBunny
- Click NEW ENTRY POINT
- Type feeding as its name
- Click ADD
- Draw an arrow from the newly created feeding entry point to AHungryBunny
In order to make the CarrotControls remember the recently active node, we're going to make use of the special recent node. It symbolizes the node which was active before the graph has been left, or if it has never been active, then it's the node the arrow from the start entry point is pointing at. Long story short - we need to add the feeding entry point and connect it with the special recent node.
And that's pretty much it! The application works as expected and consists of just one IF statement. What's worth noticing, this IF statement is not mandatory. It could be totally removed, what would make the codebase free of any IF statements, if the whole memory of the Rosmaro model was expressed using graph nodes. However, it would lead to a phenomenon called state explosion. This single IF statement turns out to be surprisingly helpful! It's one of the the tools which allow us to mitigate the risk of ending up with an enormous number of nodes and arrows, together with:
- composites (orthogonal regions)
- subgraphs (state machines in state machines)
- context (a piece of data usually in the form of a map structure) Depending on our needs, we can balance the number of nodes and IFs. There may be just one node and many IFs, or many nodes and no IFs at all.
The full source code of the application we've just built is available on GitHub - Rosmaro-React-example-Bunny-App.
Modifications worth trying out
Here are few modifications which I think are worth trying out. It doesn't mean that they represent a better approach. They're simply interesting exercises:
- removing all IF statements from method handlers (hint: it will increase the number of graph nodes)
- making the typed arrow disappear from the main graph (hint: a new subgraph will be necessary)
- adding a back button from Thanks (hint: depending on the destination screen, new nodes may be necessary)
Does it scale?
I often hear, that finite state-machines don't scale. I totally agree on that, when it comes to simple, pure FSM-based solutions. When the graph is the only memory and when every single event needs to be explicitly represented by its own arrow, even trivial tasks may lead to an enormous number of nodes and arrows.
A great example to illustrate this problem is a Hello YourName! application, which has one screen with a text input and a button and another screen to display greetings. Even if we limit the length of the name to 2 characters and allow only two letters: a and b, the graph will still look like this.
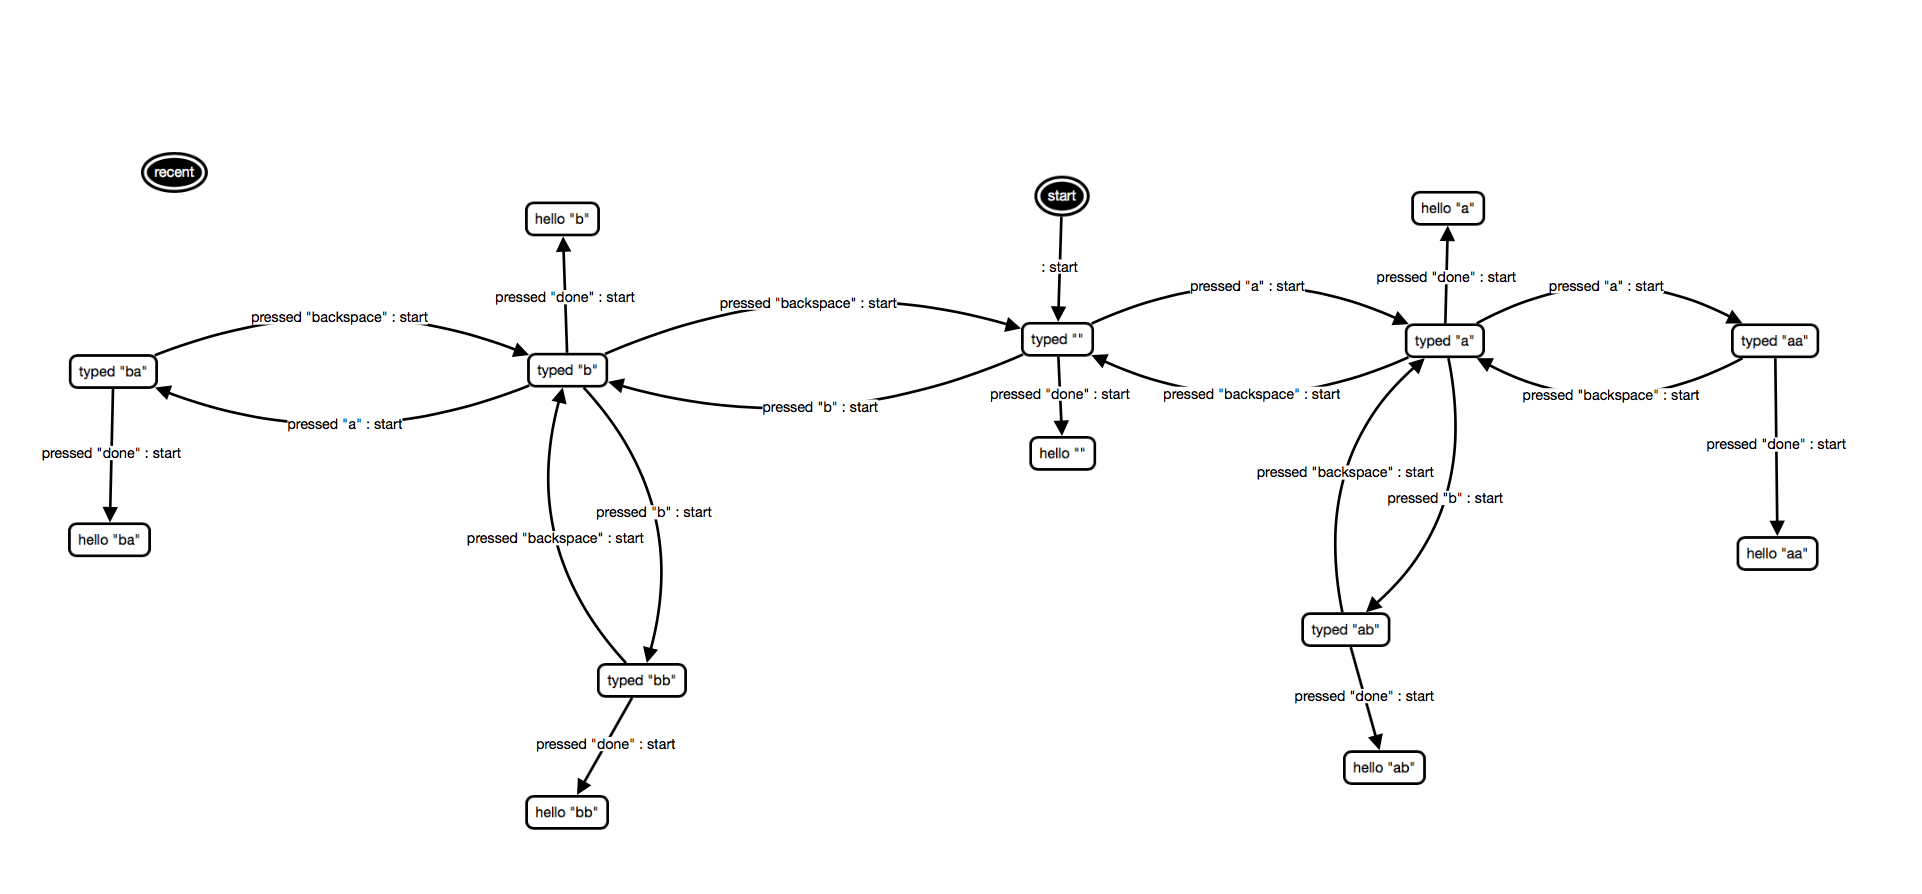 .
.
This doesn't look good.
However, there's no reason why we need to limit ourselves to just one-level graphs or even graphs at all. Thanks to the fact that Rosmaro is not a pure FSM-based solution, we can use some of the techniques described above to make the graph look exactly how we want it to look. We could even reduce the number of nodes to exactly one by replacing other nodes with IFs. Of course, it wouldn't make to much sense to use Rosmaro if we needed just one node. It simply illustrates the possibility of balancing between nodes and IFs in order to achieve a structure that represents the intended behavior of the application in a clear, documentation-like manner.
Here's the Hello YourName! application modeled using method handlers, context and subgraphs.

It doesn't look so scary, does it?
And when it comes to a bit more complex examples, here's an application with 13 different screens which depend on each other and many paths the user may take.
In the code, there are 3 IF statements. The graph consists of 29 nodes.
The main node opened in the editor looks like this.
Conclusions
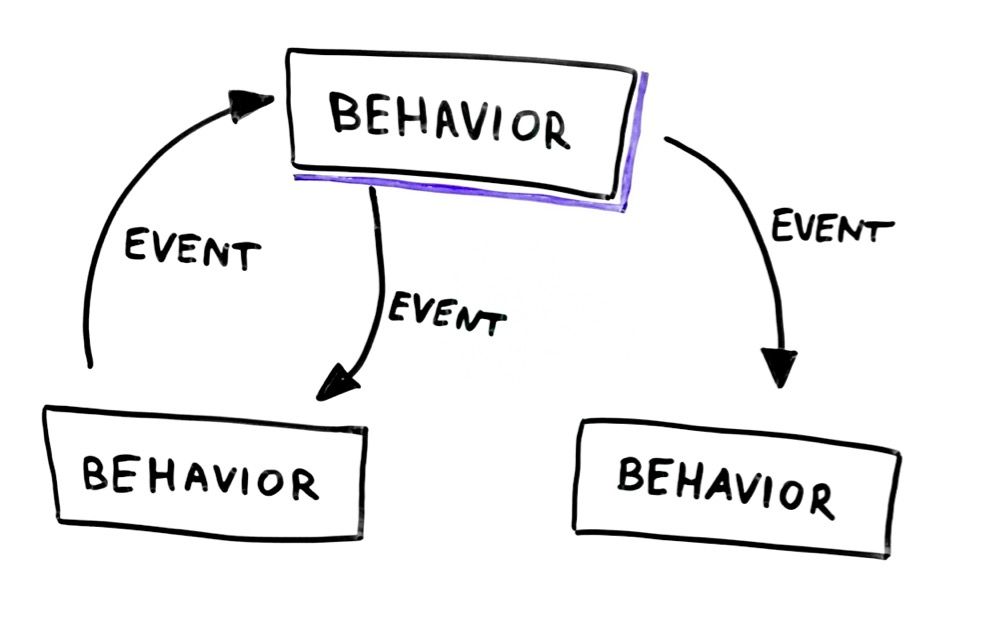
To me, visual automata-based programming turned out to be a really great discovery. For a long time, I considered state machines something almost purely theoretical. Or at least not directly applicable to the field I was working on. But then I imagined the code structured like there would be islands of clearly defined behavior. These islands are handlers from Rosmaro. There are also bridges connecting these islands. They are arrows representing events. The current behavior of the system is changed by going from one island to another. It all clicked. Now I can design and implement changes of behavior in an elegant, organized way, where previously I would just scatter IF statements.
I can also see how I benefited from automata-based programming in two different ways. It's not only easier to program by drawing boxes and arrows instead of inspecting boolean flags. It also makes it necessary to discover and name all the important states of the application, what's a great framework for thoughts.
And when it comes to application state, it showed me that there's state management beyond map structures (which are key-value pairs, like method-less JavaScript objects). A new tool appeared in my toolbox. It's the state machine based dispatch mechanism. Instead of just accepting the fact that I have some boolean values to check using IFs, I can consider replacing them with nodes. After playing a bit with this approach, I started noticing the difference between data-related state and behavior-related state. Data-related state is something like information about a user. It may be as simple as name and surname. Most of the time, we don't need to use IFs to deal with state like this. It's simply there. We can display or save it without conditional statements. A set of key-value pairs is a perfect model for state like this. On the other hand, behavior-related state determines how should the application work according to events which occurred in the past. Sometimes key-value pairs topped with a few IFs do the job very well, other times state machines feel a lot more natural and easy to understand.
If you haven't tried yet, I hope you'll give state machines a go. Maybe you'll also find them valuable in your day to day job?