An overview of the Rosmaro-TodoMVC app codebase
In the previous post about decomposing the TodoMVC app with state diagrams I showed you the state diagrams I used to build this TodoMVC app, but no code at all. Even though the diagrams are a crucial part of the implementation, as they define when and how does the behavior of the app change, they don't specify the very details of any particular behavior. It's the code's job. That's why today we're gonna take a look at the written part of the implementation. It's gonna be a broad overview of the important pieces, what should give you an idea what it is like to build a Rosmaro application, without going through all the boring details.
Directory structure
Due to the fact that the graph-code connection is managed with rosmaro-tools, the directory structure serves as a good starting point.
The model-specific part of the directory tree, that is where the behavior of the application lives, looks like this:
.
├── index.js
├── Layout
│   ├── index.js
│   ├── WholeApp
│   │   └── index.js
│   └── JustForm
│       └── index.js
└── Components
    ├── index.js
    ├── NewTodoForm
    │   ├── index.js
    │   ├── FilledIn
    │   │   └── index.js
    │   ├── Empty
    │   │   └── index.js
    │   └── lib
    │       └── form.js
    ├── List
    │   ├── index.js
    │   └── View
    │       ├── index.js
    │       └── child
    │           ├── index.js
    │           ├── Active
    │           │   ├── index.js
    │           │   ├── Editing
    │           │   │   ├── index.js
    │           │   │   ├── FilledIn
    │           │   │   │   └── index.js
    │           │   │   └── Empty
    │           │   │       └── index.js
    │           │   └── Displaying
    │           │       └── index.js
    │           ├── Completed
    │           │   ├── index.js
    │           │   ├── Editing
    │           │   │   ├── index.js
    │           │   │   ├── FilledIn
    │           │   │   │   └── index.js
    │           │   │   └── Empty
    │           │   │       └── index.js
    │           │   └── Displaying
    │           │       └── index.js
    │           └── lib
    │               ├── filtering.js
    │               ├── editing.js
    │               └── displaying.js
    └── Controls
        ├── index.js
        ├── Navigation
        │   ├── index.js
        │   └── Buttons
        │       ├── index.js
        │       ├── Completed
        │       │   └── index.js
        │       ├── All
        │       │   └── index.js
        │       ├── Active
        │       │   └── index.js
        │       └── lib
        │           └── templates.js
        ├── MarkAll
        │   ├── index.js
        │   ├── Unchecked
        │   │   └── index.js
        │   ├── Checked
        │   │   └── index.js
        │   └── lib
        │       └── view.js
        └── ClearCompleted
            ├── index.js
            ├── Visible
            │   └── index.js
            └── Hidden
                └── index.js
Please don't let the number of files scare you, as most of them are just a couple of lines long.
Their main purpose is to enable automatic graph-code bindings. Instead of manually specifying that a particular node is bound to a particular piece of code and then importing the code from its own file, with this directory-based approach we can just place the code under a path coresponding to its node and the binding is going to be built for us. We're killing two birds with one stone here!
The utility is registered as one of the npm scripts in the package.json file, so that we can re-build the automatically generated code by simply running npm run rosmaro-bindings in the terminal:
{
  "scripts": {
    "rosmaro-bindings": "rosmaro-tools bindings:build js/components/root/bindings"
  },
}
Simple handlers
The "Clear completed" button is one of the simplest subgraphs in the application. It's either hidden or visible, and when it's visible, then clicking it dispatches the CLEAR_COMPLETED action that is consumed by the list items.
The code assigned to the Visible node handles rendering the button (with an event listener) and follows the none are completed arrow when the list of items dispatches either NO_TODOS_COMPLETED or NO_TODOS:
// Visible/index.js

const noneCompleted = () => ({arrow: 'none are completed'});

export default ({dispatch}) => ({

  handler: makeHandler({

    NO_TODOS_COMPLETED: noneCompleted,
    NO_TODOS: noneCompleted,

    RENDER: () =>
      h('button.clear-completed', {
        on: {click: () => dispatch({type: 'CLEAR_COMPLETED'})}
      }, 'Clear completed')

  })

});
When the button is hidden, it renders as an empty string. As soon as the list dispatches an event like SOME_TODOS_COMPLETED or ALL_TODOS_COMPLETED, it follows the some are completed arrow in order to transition to the Visible state. Of course, the graph code is not aware of the target node, as it's specified in the graph. The graph code is concerned only about things directly related to its functions, like when should it follow one of its arrows:
// Hidden/index.js

const someCompleted = () => ({arrow: 'some are completed'});

export default ({dispatch}) => ({

  handler: makeHandler({

    ALL_TODOS_COMPLETED: someCompleted,
    SOME_TODOS_COMPLETED: someCompleted,

    RENDER: () => ''

  })

});
Coding similar behaviors
The nodes we've seen above are quite distinctive, because they react to different events and render in a totally different way. They don't really share any code. But it's not always the case. For example, the form used to add new items may also be in two differnet states: FilledIn and Empty, but the only difference between these two states is that an Empty form doesn't allow to add a new item.
To avoid code duplication and make this difference clear, the code of makes use of a shared library. This is the code of the FilledIn state:
// main/Components/NewTodoForm/FilledIn/index.js

import {makeBinding, ADD} from './../lib/form';

export default makeBinding({ADD});
It imports both the binding factory and a handler of the ADD action from the library located on the same level as the FilledIn and Empty directories.
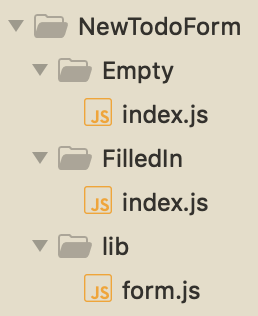
The code of the FilledIn state puts both of these pieces together to get a form that is capable of ADDing a new item. However, because the Empty is not supposed to support adding new items, it simply skips the ADD action handler:
// main/Components/NewTodoForm/Empty/index.js
import {makeBinding} from './../lib/form';

export default makeBinding({});
The makeBinding factory looks almost like a regular node binding, except for the ({ADD}) part. It's a higher order function that takes the ADD action handler so that it may be placed in the binding:
// main/Components/NewTodoForm/lib/form.js

export const makeBinding = ({ADD}) => ({dispatch}) => ({

  handler: makeHandler({

    RENDER: ({toNode, context}) =>
      h('input.new-todo', {
        props: {
          placeholder: 'What needs to be done?',
          value: context.content,
        },
        hook: {
          insert: ({elm}) => elm.focus()
        },
        on: {
          keydown: ({key}) => key === "Enter"
            ? dispatch(toNode({type: 'ADD'}))
            : undefined,
          input: ({target: {value}}) => dispatch(toNode({type: 'TYPE', value}))
        }
      }),

    TYPE: ({action: {value: content}, context}) => {
      const arrow = trim(content) ? 'changed' : 'cleared';
      return {
        arrow: arrow,
        context: {...context, content}
      };
    },

    ADD,

  })

});
The handler of the ADD action is placed in the library as well:
// main/Components/NewTodoForm/lib/form.js

export const ADD = ({context: {content}}) => ({
  context: {content: ''},
  arrow: 'cleared',
  effect: [{
    type: 'DISPATCH',
    action: {type: 'TODO_ADD', content: trim(content)}
  }],
});
It clears the input by setting the context to {content: ''}, follows an arrow called cleared and dispatches a {type: 'TODO_ADD', content} action. This action is then consumed by the subgraph responsible for handling the list of items.
Working with a big context object
Every Rosmaro model uses one big, global context object. It's very much like the global store in Redux (and that's why Redux is such a great environment to run Rosmaro models!). As we've seen, from the form's perspective the context looks like this:
{
    content: 'What I am typing'
}
Does it mean there's no other data in the context? No, of course there is more data! The whole context looks actually like this:
{
  newTodoForm: {
    content: 'What I am typing'
  },
  list: {
    todos: [
      {
        id: 2,
        content: 'zc'
      },
      {
        id: 1,
        content: 'asdf'
      }
    ],
    lastId: 2
  }
}
The form may focus solely on its tiny part thanks to a lens attached to the NewTodoForm state. It selects a small slice of the whole object (newTodoForm) and in case there's no such property, it provides an initial value ({content: ''}):
// main/Components/NewTodoForm/index.js

export default opts => ({
  lens: () => compose(
    sliceLens('newTodoForm'),
    initialValueLens({content: ''}
  )),
  handler: transparentHandler,
});
What sets lenses apart from Redux selector is that they work in both ways, not only zooming in to focus on a small part, but also zooming out to allow updates of the original, big object. This is how the form may not only read context.content, but also update context.content without being aware it's actually context.newTodoForm.content.
If you'd like to learn more about Ramda lenses, I strongly recommend checking out the chapter on lenses in the official Ramda documentation.
List filtering
Another aspect that in my opinion deserves attention is how does the filter work. Usually todo apps relay on some form of a filter function that discards all the entries that don't match the current filter status. There's nothing wrong with this approach! However, in order to demonstrate that there are also other ways, this implementation uses map instead of filter. Both Completed and Active items are difned with a list of states in which they should be rendered:
// main/Components/List/View/child/Active/index.js

export default makeBindings({
  state: 'active',
  renderWhen: ['all', 'active'],
});
Their RENDER handler is a bit different than in the case of the other nodes. Instead of simply returning a VDOM node, it returns an object with keys corresponding to all the possible states of the filter. For example, the Active node renders in the following way:
{
    completed: ''
    all: renderedItem,
    active: renderedItem
}
Navigation states don't only render a bunch of buttons, but also pick a specific key from the object returned by each item. In this case, it's active:
// main/Components/Controls/Navigation/Buttons/Active/index.js

export default makeBinding({
  selected: 'active',
  buttons: {
    allTodosButton: allTodosButton.notSelected,
    completedTodosButton: completedTodosButton.notSelected,
    activeTodosButton: activeTodosButton.selected,
  }
});
The makeBinding factory looks like this:
// main/Components/Controls/Navigation/Buttons/lib/templates.js
export const makeBinding = ({selected, buttons: {allTodosButton, completedTodosButton, activeTodosButton}}) => () => ({
handler: makeHandler({
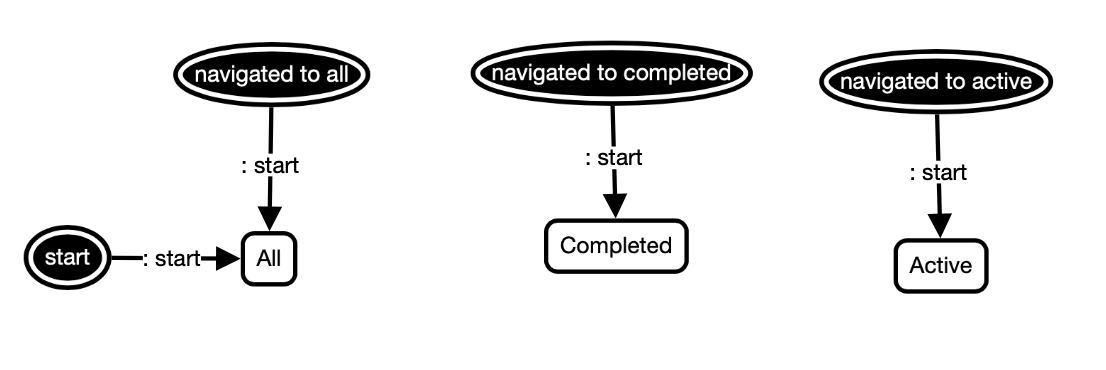
NAVIGATE_TO_ALL: () => ({arrow: 'navigated to all'}),
NAVIGATE_TO_COMPLETED: () => ({arrow: 'navigated to completed'}),
NAVIGATE_TO_ACTIVE: () => ({arrow: 'navigated to active'}),
RENDER: ({context, action, children}) => ({
ui: h('ul.filters', [
allTodosButton,
completedTodosButton,
activeTodosButton
]),
selectTodos: map(prop(selected))
})
})
});What's important to note is that the RENDER handler returns both the ui and a selectTodos function that selects one particular key from every object on the list. That way, when both Navigation and List are rendered, the map fuction provided by Navigation is applied to the list of items returned by List.
List events
So far we've seen how various parts of the application react to events related to the list of items. For example, the "Clear completed" button disappears, when there are no completed items. But where do messages like this come from?
Events like ALL_TODOS_COMPLETED, SOME_TODOS_COMPLETED, NO_TODOS_COMPLETED, and NO_TODOS are dispatched by the List node. Every time an action that may cause a transition reaches one of the item nodes, the parent of all of them asks its children their current state. It does it by dispatching a GET_STATE action to its children. It doesn't directly read their state, because it's considered an implementation detail and may be actually quite complex. In fact, an item may not only be Active, but also in the Editing state with the form being FilledIn. All these detail don't really matter from the point of view of the List, which expects either just active or completed. It's a bit like in Java where it's a good practice to use a getter method instead of directly accessing object properties, because the internal property may change, be calculated on the fly or the read operation may be delegated to some other object:
// main/Components/List/View/index.js
const getStateAction = {type: 'GET_STATE'};

const readStats = ({context, children}) => {
  const childrenResults = callChildren({context, children, action: getStateAction});
  return pipe(
    values,
    map(prop('data')),
    reduce((soFar, state) => ({
      ...soFar,
      [state]: soFar[state] + 1
    }), {active: 0, completed: 0})
  )(childrenResults.result);
};

const buildEffects = stats => {
  if (stats.completed && !stats.active) {
    return [{type: 'DISPATCH', action: {type: 'ALL_TODOS_COMPLETED'}}];
  }

  if (stats.completed) {
    return [{type: 'DISPATCH', action: {type: 'SOME_TODOS_COMPLETED'}}];
  }

  if (stats.active) {
    return [{type: 'DISPATCH', action: {type: 'NO_TODOS_COMPLETED'}}];
  }

  return [{type: 'DISPATCH', action: {type: 'NO_TODOS'}}];
};

// ...

DISPATCH_EVENTS: ({context, action, children}) => {
  const stats = readStats({context, children});
  const effect = buildEffects(stats);
  return {effect};
},
The DISPATCH_EVENTS handler uses the readStats function to call the children, get stats in the form of an object like {active: 3, completed: 8} and pass them to the buildEffects function in order to get effect objects describing the current state of the list, like SOME_TODOS_COMPLETED.
Routing
The last part I'd like to show you is the routing. It uses Navigo to associate callback functions with routes. Every time a route is visited, it dispatches an action:
// app.js
router
  .on('/', () => dispatchFn({type: 'NAVIGATE_TO_ALL'}))
  .on('/active', () => dispatchFn({type: 'NAVIGATE_TO_ACTIVE'}))
  .on('/completed', () => dispatchFn({type: 'NAVIGATE_TO_COMPLETED'}))
The UI renders ordinary links:
// main/Components/Controls/Navigation/Buttons/lib/templates.js

const notSelectedButton = ({path, name}) =>
  h('li',
    h('a', {props: {href: path}}, name)
  );
Because in this simple app every filter may be accessed at any time, all three navigation actions are supported in every state of the app:
// main/Components/Controls/Navigation/Buttons/lib/templates.js

NAVIGATE_TO_ALL: () => ({arrow: 'navigated to all'}),
NAVIGATE_TO_COMPLETED: () => ({arrow: 'navigated to completed'}),
NAVIGATE_TO_ACTIVE: () => ({arrow: 'navigated to active'}),
As mentioned in the previous post, entry points are used to mitigate state explosion. You can read more about entry points in the documentation of Rosmaro.
Coming soon
Thank you for reading this post! In the next part we're gonna focus on the test suite powered by rosmaro-testing-library, redux-mock-store, and snabbdom-testing-library.
You can find the complete code of this app on GitHub.